You have a Ninja Creami. You want vanilla ice cream. The path from point A to point B seems simple, but the results can be surprisingly inconsistent. One batch is icy, the next is buttery, and the dream of a perfect, creamy scoop made in your own kitchen feels just out of reach.
I understand that frustration. As someone who has spent years analyzing food composition and testing kitchen appliances, I know that precision matters. This guide is the result of my own testing, moving beyond the basic pamphlet instructions to create a formula that works every single time. We will build the definitive vanilla ice cream for your Ninja Creami, a recipe that serves as a master template for all your future frozen creations.
Below, you will find the core recipe, followed by a deep analysis of every component. We will examine the science of the ingredients, navigate dietary adaptations, and explore the cultural weight of vanilla itself. My goal is to ensure your next pint is not just good, but exceptional.
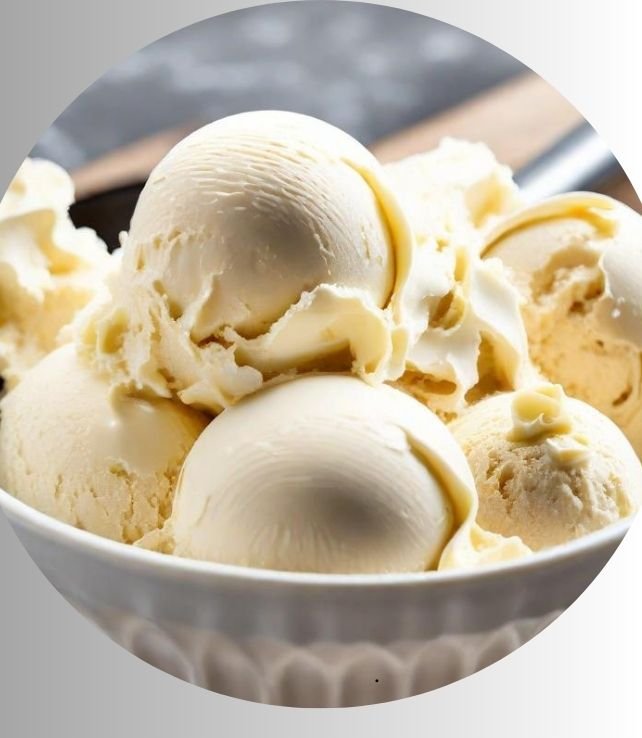
How to Make Ninja Creami Vanilla Ice Cream
This is the foundational recipe. Follow these measurements and steps precisely for a classic, rich, and scoopable vanilla ice cream. The subsequent sections will explain the “why” behind each choice.
Recipe Details
- Prep Time: 10 minutes
- Cook Time: 5 minutes (for base)
- Freeze Time: 24 hours
- Servings: 1 Pint (approx. 4 servings)
- Course: Dessert
- Cuisine: American
- Diet: Vegetarian
Ingredients
- 1 1/4 cups (300 ml) whole milk
- 3/4 cup (180 ml) heavy cream (36-40% fat)
- 1/3 cup (67 g) granulated sugar
- 2 tablespoons (30 g) light corn syrup or glucose syrup
- 1/8 teaspoon fine sea salt
- 1 tablespoon pure vanilla extract
- 1/2 teaspoon vanilla bean paste (optional, for specks)
Instructions
- In a medium saucepan, combine the whole milk, heavy cream, granulated sugar, corn syrup, and salt.
- Place the saucepan over medium heat. Warm the mixture, stirring frequently, until the sugar and salt are fully dissolved and the liquid is steaming but not boiling. This should take about 3-5 minutes. Do not let it simmer.
- Remove the pan from the heat. Stir in the vanilla extract and vanilla bean paste (if using).
- Allow the mixture to cool at room temperature for 20 minutes, then transfer it to a clean Ninja Creami pint container. Secure the lid.
- Place the pint in the freezer on a level surface. Freeze for a full 24 hours to ensure the core is completely solid.
- Remove the pint from the freezer. Take off the lid and place the pint into the outer bowl of the Ninja Creami. Process on the “ICE CREAM” setting.
- After the cycle finishes, check the texture. If it appears crumbly, use the “RE-SPIN” function. For a denser, softer-serve consistency, use the “RE-SPIN” function a second time.
- Serve immediately for soft-serve texture, or scoop the ice cream into a storage container, press parchment paper directly onto the surface, and freeze for 1-2 hours for a firmer, scoopable texture.
Nutrition
- Calories: 285 kcal
- Protein: 3 g
- Fat: 18 g
- Carbohydrates: 28 g
- Sugar: 26 g
- Fiber: 0 g
- Sodium: 95 mg
- Cholesterol: 65 mg
Note: Nutritional information is an estimate per serving, based on 4 servings per pint. Values will change with ingredient substitutions.
Cooking Method
This recipe uses the “cooked base” method. Gently heating the dairy and sugars ensures the sugar crystals are fully dissolved and the proteins in the milk are lightly denatured, which results in a smoother final texture and a more cohesive flavor profile compared to a simple “mix-and-freeze” approach.
Tools Needed
- Ninja Creami machine
- Ninja Creami pint container and lid
- Medium saucepan
- Whisk or silicone spatula
- Measuring cups and spoons
Ingredient Analysis: The Science of Creaminess
Great ice cream is an emulsion and a foam. Understanding the role of each component allows you to troubleshoot and adapt with confidence.
Dairy: The Structural Foundation
The ratio of milk to cream is critical. Whole milk provides water, lactose (milk sugar), and proteins (casein and whey). The proteins help emulsify fat and water, while the lactose contributes sweetness and lowers the freezing point.
Heavy cream, with its high butterfat content (36-40%), is responsible for the luxurious mouthfeel and carries flavor. Too little fat, and the ice cream tastes icy and thin. Too much, and it can become greasy and leave a coating on the palate. The 1 1/4 cups milk to 3/4 cup cream ratio here creates a butterfat percentage ideal for the Ninja Creami’s churning action.
Sugar and Sweeteners: More Than Sweetness
Sugar does far more than make ice cream sweet. It lowers the freezing point of the mixture, preventing it from becoming a solid block of ice. Granulated sucrose is our primary sweetener.
The inclusion of light corn syrup (or glucose syrup) is a professional technique. These are invert sugars, meaning they are more effective at binding water molecules than sucrose alone. This action reduces ice crystal formation, yielding a smoother, creamier texture that stays softer straight from the freezer. It is not just a sweetener; it is a texture modifier.
Vanilla: The Star of the Show
Vanilla is often considered “plain,” but it is one of the world’s most complex and labor-intensive spices. Using a combination of pure vanilla extract and vanilla bean paste provides depth.
Pure vanilla extract offers a well-rounded, aromatic top note. Vanilla bean paste, which contains the seeds of the vanilla pod suspended in a thick syrup, provides the visual signature of tiny black specks and a deeper, more custard-like flavor. For the most authentic result, I recommend using both. The flavor compounds in vanilla are volatile; adding them off-heat preserves their delicate aroma.
The Role of Salt
Salt is a flavor enhancer. A small amount of fine sea salt in the base does not make the ice cream taste salty. Instead, it amplifies the perception of sweetness and rounds out the vanilla flavor, making it taste richer and more complete.
Nutritional Perspective and Dietary Adaptations
From a dietary standpoint, this recipe is a source of energy-dense calories, primarily from fats and sugars. It is a dessert. However, by controlling the ingredients, you avoid the stabilizers, emulsifiers, and excess air (overrun) common in commercial products.
Macronutrient Breakdown
The fat content provides satiety and mouthfeel. The sugars, while significant, are from identifiable sources rather than high-fructose corn syrup blends. The protein content is minimal but present from the dairy. Enjoying a controlled portion of a high-quality homemade dessert can be part of a balanced pattern of eating.
Creating Dietary Variations
The Ninja Creami is excellent for adaptation. Here are tested modifications for the master recipe.
Vegan and Dairy-Free Vanilla Ice Cream
Replace the dairy with full-fat canned coconut milk. Use one 13.5-ounce can. The high fat content is crucial. Substitute granulated sugar with organic cane sugar (ensuring it’s not processed with bone char if strict vegan). The corn syrup can remain, as most are vegan, or use agave syrup. Add 1/4 teaspoon of xanthan gum blended with the sugar before mixing to stabilize the lack of dairy proteins.
Lower-Sugar Vanilla Ice Cream
Reduce granulated sugar to 3 tablespoons. Increase corn syrup to 3 tablespoons. Corn syrup is less sweet than sucrose by volume, so this swap maintains freezing-point depression and texture while reducing overall sweetness. Alternatively, use a monk fruit/allulose blend designed for baking, following the brand’s sugar-equivalent measurements, as these sweeteners freeze well.
Keto-Friendly Version
Use the dairy base or a combination of heavy cream and unsweetened almond milk. Replace all sugars with a powdered erythritol/allulose blend (about 1/3 cup + 2 tbsp). Add 1 teaspoon of vegetable glycerin or 1/4 teaspoon of guar gum to prevent a sandy texture and excessive hardening.
The History and Cultural Weight of Vanilla
Vanilla’s journey to our freezers is a global story. The vanilla orchid (Vanilla planifolia) is native to Mesoamerica, where the Totonac people of present-day Mexico were likely the first to cultivate it. The Aztecs used it, known as *tlilxochitl* (black flower), to flavor *xocolātl*, a chocolate drink.
For centuries, vanilla was exclusively a Mexican product because its natural pollinator, a specific Melipona bee, lived only there. In 1841, a 12-year-old enslaved boy on Réunion Island, Edmond Albius, discovered the manual pollination method still used today, enabling global cultivation. This history explains vanilla’s high cost—it is the second most expensive spice after saffron, due to this intensive hand-labor.
In the 19th century, vanilla ice cream became a staple of American and European desserts. Its “plain” status is a misnomer; it is the benchmark against which all other ice creams are measured, a flavor that demands purity and quality in its ingredients.
Common Mistakes and Techniques for Perfection
After testing dozens of pints, I have identified the most frequent errors that prevent ideal results.
Insufficient Freezing Time
The single biggest error is not freezing the base long enough. The Ninja Creami requires a completely solid pint. A minimum of 24 hours is non-negotiable. A still-slushy center will not process correctly, leading to a soupy or uneven texture.
Neglecting the “Re-Spin” Function
The “Ice Cream” cycle is often just the first step. The machine’s blade breaks the solid block into crumbles. The “Re-Spin” function continues to churn and warm those crumbles into a homogeneous, creamy mass. Do not hesitate to use it once or even twice until the texture is smooth.
Using Low-Fat Dairy or Incorrect Substitutions
Skim milk or half-and-half will not produce a creamy result. They contain too much water and not enough fat, guaranteeing an icy texture. If you must substitute, follow the dietary adaptation guidelines above which include stabilizers to compensate.
Overheating the Base
You are not making custard. There is no need to boil or simmer the mixture. The goal is to dissolve the sugars. Overheating can cause the milk proteins to coagulate or give a “cooked” flavor. Heat just until steam rises and you can no longer feel sugar granules when rubbing the liquid between your fingers.
Serving, Storage, and Advanced Applications
Your freshly spun ice cream is ready to enjoy, but with a few steps, you can perfect its presentation and longevity.
Optimal Serving Texture
Straight from the Creami after a Re-Spin, the texture is like soft-serve. For classic, scoopable ice cream, transfer it to a shallow, airtight container, press a piece of parchment paper directly onto the surface to prevent ice crystals, and freeze for 1-2 hours.
Long-Term Storage
Homemade ice cream is best consumed within a week. Store it in an airtight container with parchment paper pressed on the surface. When you want to eat it, let it temper on the counter for 5-10 minutes for easier scooping.
Using This Base for Other Flavors
This vanilla recipe is your blank canvas. For chocolate, add 1/4 cup of high-quality cocoa powder to the warm base, whisking vigorously to dissolve. For fruit swirls, prepare a thick compote (cook fruit with a little sugar until jammy) and layer it in after the first “Ice Cream” spin, then use the “MIX-IN” function.
The Machine: How the Ninja Creami Works
Understanding the appliance demystifies the process. Unlike a traditional ice cream maker that churns a liquid while cooling it, the Ninja Creami is a “processor.” It starts with a fully frozen block.
The machine’s blade, or “Creamerizer Paddle,” is uniquely designed to shave the frozen base into tiny, fine particles. As it spins, friction slightly warms the shavings, and the paddle simultaneously folds and aerates them, creating a creamy emulsion from a solid state. This is why the initial freeze must be complete and why the Re-Spin function is so effective—it continues this warming and folding process.
Frequently Asked Questions
Why is my Ninja Creami ice cream icy?
Icy texture usually results from one of three issues: not using enough fat or sugar (which depress the freezing point), insufficient processing (skip the Re-Spin), or using a base with too much water, like fruit juice or low-fat milk, without added stabilizers.
Can I double this recipe in one pint?
No. Do not overfill the pint container. The mixture needs room to expand as it freezes, and the blade needs space to operate. The fill line on the Ninja Creami pint is there for a reason. Always follow it.
Can I use vanilla flavoring instead of pure extract?
I do not recommend it. Artificial vanilla flavoring (vanillin) provides only one of the hundreds of flavor compounds in pure vanilla. The result will taste flat and synthetic. For the best flavor, invest in pure vanilla extract.
My ice cream tastes buttery or greasy. What happened?
A greasy mouthfeel often indicates the butterfat in the cream has partially churned into butter. This can happen if the base was over-churned in the machine. Stick to the recommended cycles—”Ice Cream” followed by one or two “Re-Spins”—and avoid running it longer than necessary.
How can I make this recipe without corn syrup?
You can substitute the corn syrup with an equal amount of agave nectar or honey (which will impart its own flavor). For a neutral taste, use 1 tablespoon of vodka or another neutral spirit; the alcohol will lower the freezing point similarly, though the texture may be slightly less chewy.
Is it necessary to heat the mixture first?
While you can mix the ingredients cold, gently heating them ensures the sugars and salts are fully dissolved and integrated. This creates a more uniform base that freezes and processes more evenly, leading to a smoother final product.
Can I use this base for sorbet?
No, this is a dairy-based formula. For a sorbet, you would use a simple syrup base with fruit puree. The lack of fat and dairy protein requires a different ratio of sugars and often a stabilizer like pectin or a small amount of alcohol to achieve a smooth texture.
Why did my ice cream shrink dramatically after spinning?
Some shrinkage is normal as air is incorporated and the structure loosens. Dramatic shrinkage can occur if the base was not frozen solid, causing it to melt significantly during processing. Always ensure a full 24-hour freeze.