Finding a loaf of bread at the supermarket with less than 200 milligrams of sodium per slice is a difficult task. For individuals managing blood pressure, heart health, or kidney function, this daily staple can become a significant source of unwanted salt. I understand this challenge not just from my work as a dietitian, but from personal experience helping family members navigate these dietary restrictions.
The solution is not to give up bread, but to reclaim it. This low sodium bread recipe provides a complete, step-by-step guide to creating a flavorful, satisfying loaf entirely in your control. You will find the full recipe details, including precise measurements and instructions, in the first section of this article.
Beyond the basic steps, we will examine the science of salt in baking, explore comprehensive ingredient alternatives, and provide adaptations for various dietary needs. My goal is to offer a single resource that answers every question you might have about crafting excellent low-sodium bread at home.
How to Make Low Sodium Bread Recipe
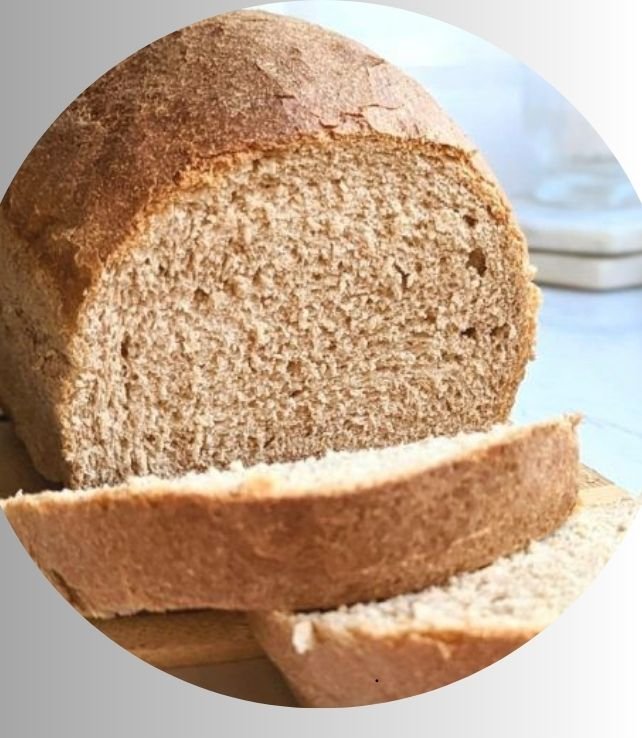
This recipe yields a classic, soft sandwich loaf with a tight crumb and golden crust. It uses a straightforward direct dough method, making it accessible for bakers of all levels. The key lies in strategic ingredient selection and technique to compensate for the reduced salt.
Recipe Details
- Prep Time: 20 minutes (plus 1.5 hours rising)
- Cook Time: 35 minutes
- Servings: 16 slices (one 9×5 inch loaf)
- Course: Side, Bread
- Cuisine: American
- Diet: Low Sodium, Vegetarian
Ingredients
- 2 ¼ teaspoons (one ¼-ounce packet) active dry yeast
- 1 ¼ cups warm water (105-115°F)
- 1 tablespoon honey or granulated sugar
- 3 cups (360g) bread flour, plus more for dusting
- ¼ cup (30g) whole wheat flour
- 2 tablespoons non-fat dry milk powder
- 2 tablespoons unsalted butter, softened
- ¼ teaspoon ground cinnamon (optional, enhances flavor complexity)
- 1 large egg white, for wash (optional)
- Rolled oats or seeds, for topping (optional)
Instructions
- In a large mixing bowl or the bowl of a stand mixer, combine the warm water, honey, and yeast. Stir gently and let sit for 5-10 minutes until the mixture is frothy.
- Add the bread flour, whole wheat flour, dry milk powder, and cinnamon (if using) to the yeast mixture. Using the dough hook attachment or a wooden spoon, mix until a shaggy dough forms.
- Add the softened butter. Knead on medium-low speed for 8-10 minutes, or by hand on a lightly floured surface for 12-15 minutes, until the dough is smooth, elastic, and passes the windowpane test (a small piece can be stretched thin without tearing).
- Shape the dough into a ball. Place it in a lightly oiled bowl, turning once to coat. Cover with a damp kitchen towel or plastic wrap. Let rise in a warm, draft-free place for 60-90 minutes, or until doubled in size.
- Lightly grease a 9×5 inch loaf pan. Punch down the risen dough to release air bubbles. Turn it out onto a lightly floured surface and shape into a rectangle roughly the length of your pan.
- Tightly roll the rectangle into a log, pinching the seam and ends to seal. Place the loaf, seam-side down, into the prepared pan. Cover and let rise again for 30-45 minutes, until the dough crests about 1 inch above the pan rim.
- Preheat your oven to 375°F (190°C). If desired, brush the loaf top with a lightly beaten egg white and sprinkle with oats or seeds.
- Bake for 30-35 minutes, until the crust is deep golden brown and the loaf sounds hollow when tapped on the bottom. An internal thermometer should read 190°F (88°C).
- Immediately remove the bread from the pan and transfer to a wire rack. Allow it to cool completely before slicing, about 2 hours. This prevents a gummy texture.
Nutrition
- Calories: 110 kcal
- Protein: 4 g
- Fat: 2 g
- Carbohydrates: 20 g
- Sugar: 1 g
- Fiber: 1 g
- Sodium: 5 mg
- Cholesterol: 3 mg
Note: Nutritional data is an estimate per slice, calculated using unsalted butter and without optional toppings. Values may vary based on specific ingredient brands.
Cooking Method
This recipe uses conventional oven baking. The process involves yeast fermentation (proofing), kneading to develop gluten structure, two rises for proper texture, and finally baking in a standard loaf pan to set the structure and create the crust.
Tools Needed
- Large mixing bowl or stand mixer with dough hook
- 9×5 inch loaf pan
- Measuring cups and spoons
- Kitchen scale (recommended for accuracy)
- Dough scraper (optional but helpful)
- Wire cooling rack
- Pastry brush (optional, for egg wash)
The Role of Salt in Baking and How to Compensate
Salt is more than a flavor enhancer in bread. It performs critical chemical and biological functions. Understanding these roles is the first step to successfully removing it.
Salt strengthens gluten, the protein network that gives bread its structure and chew. It also regulates yeast activity, preventing overly rapid fermentation that can lead to large, unstable air pockets and a coarse texture. Finally, salt is a powerful flavor potentiator, making other ingredients taste more pronounced.
Structural Support Without Salt
To compensate for gluten weakening, we use bread flour. Bread flour has a higher protein content (12-14%) than all-purpose flour, providing more gluten-forming potential from the start. The extended kneading time is non-negotiable; it fully develops this gluten network to ensure the loaf can hold its shape and trap gas during rising.
Adding a small portion of whole wheat flour introduces other proteins and fibers that contribute to a sturdy crumb. The dry milk powder provides milk solids that also help with browning and tenderizing the crumb structure.
Flavor Development Strategies
This is where creativity meets science. Salt’s flavor role is the hardest to replace directly. Our approach uses layering and fermentation.
The honey or sugar is not just yeast food; its caramelization during baking adds depth. The optional cinnamon is a classic baker’s trick—a minuscule amount acts as a flavor bridge, enhancing the wheat’s natural sweetness without tasting like cinnamon bread. Using a longer, slower first rise at a slightly cooler temperature (around 75°F) allows for more complex organic acids to develop through fermentation, which naturally enriches the flavor profile.
Comprehensive Ingredient Analysis and Substitutions
Every component in this recipe has a purpose. Let’s examine the attributes of each and explore viable alternatives to suit different pantries and dietary requirements.
Flour: The Foundation
Bread flour is our primary choice for its high gluten protein (glutenin and gliadin) content. If you only have all-purpose flour, the loaf will be slightly more tender and may not rise as high. For a 100% whole wheat loaf, replace all flour with whole wheat flour, but increase the water by 2-3 tablespoons and expect a denser, more nutritious result.
For a gluten-free adaptation, a dedicated gluten-free bread flour blend (containing xanthan or guar gum) is required. Follow the blend’s specific liquid requirements, as they differ greatly from wheat flour.
Liquid and Leavening
The warm water hydrates the flour and activates the yeast. Temperature is critical; too hot will kill the yeast, too cold will drastically slow it down. Active dry yeast was chosen for its wide availability. You can substitute instant yeast; use the same amount and mix it directly with the dry ingredients, slightly reducing the rise times.
The sweetener, honey, feeds the yeast and retains moisture. An equal amount of maple syrup, agave nectar, or granulated sugar works perfectly. Sugar-free alternatives like monk fruit or stevia blends designed for baking can be used, but they will not provide the same browning or moisture retention.
Fats and Dairy
Unsalted butter enriches the dough, contributes to a tender crumb, and aids in browning. You can substitute an equal amount of a neutral oil like avocado or grapeseed oil. For a dairy-free version, use a plant-based butter or oil and replace the dry milk powder with a soy milk powder or simply omit it, adding an extra tablespoon of flour to compensate.
The dry milk powder is a low-sodium powerhouse. It improves crust color via the Maillard reaction, softens the crumb, and adds nutritional value like protein and calcium. It is a key, often overlooked, ingredient in low-sodium baking.
Nutritional Perspective and Health Considerations
From a clinical standpoint, this recipe transforms bread from a high-sodium food into a controlled component of a therapeutic diet. At approximately 5 milligrams per slice, it aligns with very low sodium dietary patterns, often defined as less than 500 milligrams per day.
Macronutrient and Micronutrient Profile
The bread provides complex carbohydrates for energy, with a modest amount of fiber, particularly if you incorporate the whole wheat portion or seeds. The protein content, boosted by the bread flour, dry milk, and optional egg wash, is reasonable for a grain-based food.
The use of unsalted butter keeps saturated fat low. For those also monitoring cholesterol, the minimal amount from butter can be eliminated by using oil, and the egg white wash can be skipped or replaced with a water wash.
Integrating into a Balanced Diet
This bread allows for greater dietary flexibility. You can now enjoy a sandwich or toast while allocating your daily sodium budget to other foods like lean proteins, vegetables, or a modest amount of cheese. It empowers you to manage overall intake without feeling deprived of a fundamental food group.
Cultural and Historical Context of Bread and Salt
Bread and salt have been intertwined for millennia. Salt was a precious commodity used not only to flavor and preserve bread but also as a symbol of hospitality and covenant in many cultures. The very word “salary” derives from the Roman practice of paying soldiers in salt.
Historically, bread was often made with very little salt, especially in inland areas where salt was expensive or unavailable. The taste would have been blander, relying on the natural flavor of well-fermented grains. Our modern expectation of bread’s saltiness is a relatively recent development, influenced by industrial production where salt became a cheap and effective flavor enhancer and preservative.
In this sense, baking low sodium bread connects us to an older, more elemental tradition of baking, where the pure taste of wheat and the transformative magic of fermentation were the stars.
Common Mistakes and Expert Techniques for Success
Even with a detailed recipe, small errors can affect the outcome. Here are the pitfalls to avoid and professional tips to guarantee a perfect loaf.
Mistake 1: Inaccurate Flour Measurement
Scooping flour directly from the bag packs it down, leading to over-measurement and a dry, dense dough. The best practice is to spoon flour into your measuring cup and level it off. For ultimate precision, use a kitchen scale.
Mistake 2: Under-Kneading the Dough
Without salt’s strengthening effect, gluten development is paramount. Do not shortcut the kneading time. The windowpane test is your best indicator: take a small piece of dough and gently stretch it. If it forms a thin, translucent membrane without tearing, it is ready.
Mistake 3: Slicing While Warm
The bread continues to cook and set its structure as it cools. Cutting into it releases steam and causes the interior to become gummy and compress. Patience is essential for the ideal texture.
Expert Tip: The “Sponge” or “Poolish” Method
For even more flavor complexity, consider a pre-ferment. Mix half the flour, all the water, and the yeast the night before. Let it ferment at room temperature for an hour, then refrigerate for 12-16 hours. The next day, mix this sponge with the remaining ingredients. This technique builds exceptional flavor depth that wonderfully compensates for the lack of salt.
Serving, Storage, and Recipe Variations
Once you have mastered the basic loaf, you can adapt it for different uses and ensure it stays fresh.
Serving and Pairing Suggestions
This bread is excellent for sandwiches, toast, or as a side to soups and salads. Its neutral flavor profile makes it versatile. Top it with unsalted nut butter, mashed avocado, or a homemade low-sodium bean spread. For a heartier meal, use it in a bread pudding made with unsalted ingredients.
Optimal Storage Methods
Because it lacks salt, a natural preservative, this bread is best consumed within 2-3 days. Store it in a bread box or a paper bag at room temperature to maintain the crust’s texture. For longer storage, slice and freeze it in an airtight bag for up to 3 months. Thaw slices directly in a toaster.
Recipe Variations to Explore
You can customize this dough easily. For a seeded loaf, incorporate 2-3 tablespoons of sunflower, pumpkin, or flax seeds into the dough during kneading. For a herb bread, add 1-2 tablespoons of dried rosemary, thyme, or oregano. For a richer dinner roll variation, shape into rolls after the first rise, brush with melted unsalted butter, and bake for 18-20 minutes.
Frequently Asked Questions
Can I use all-purpose flour instead of bread flour?
Yes, you can substitute all-purpose flour in equal measure. The resulting loaf will have a slightly softer structure and may not rise as high due to the lower protein content. Ensure you knead the dough thoroughly to develop as much gluten as possible.
Why is my low sodium bread so dense?
Density is usually caused by one of three factors: inaccurate flour measurement (too much flour), under-kneading, or dead yeast. Ensure your yeast is active by testing it in the warm water with honey, measure flour carefully by weight or the spoon-and-level method, and knead until the dough passes the windowpane test.
How can I add more flavor without salt?
Focus on ingredients that add umami, sweetness, or herbal notes. Incorporate a tablespoon of nutritional yeast for a cheesy, savory depth. Toast the flour lightly in a dry skillet before using to enhance its nutty flavor. Add spices like garlic powder, onion powder, or smoked paprika directly into the dry ingredients.
Is this bread suitable for a renal (kidney) diet?
This recipe is very low in sodium, which is beneficial for renal diets. However, individual renal diets have specific restrictions for potassium and phosphorus. Consult with your renal dietitian to ensure the ingredient choices, particularly the whole wheat flour and dry milk powder, align with your individual needs.
Can I make this dough in a bread machine?
Absolutely. Add the liquid ingredients to the pan first, followed by the dry ingredients, with the yeast going in last on top of the flour. Use the dough cycle. Once complete, remove the dough, shape it, place it in a standard loaf pan for the second rise, and bake in your conventional oven as directed for the best crust.
My dough didn’t rise. What went wrong?
The most common culprit is yeast that was killed by water that was too hot. Water should feel warm to the touch, not hot. Another possibility is an old yeast packet that has lost its potency. Always check the expiration date and proof the yeast as directed in step one to confirm it is active.
Can I omit the sugar for a truly sugar-free bread?
You can reduce or omit the honey, but the yeast requires some sugar to feed on for optimal rise. The small amount used is largely consumed during fermentation. If you omit it entirely, the rise may be slower and less robust, and the crust will be paler.