
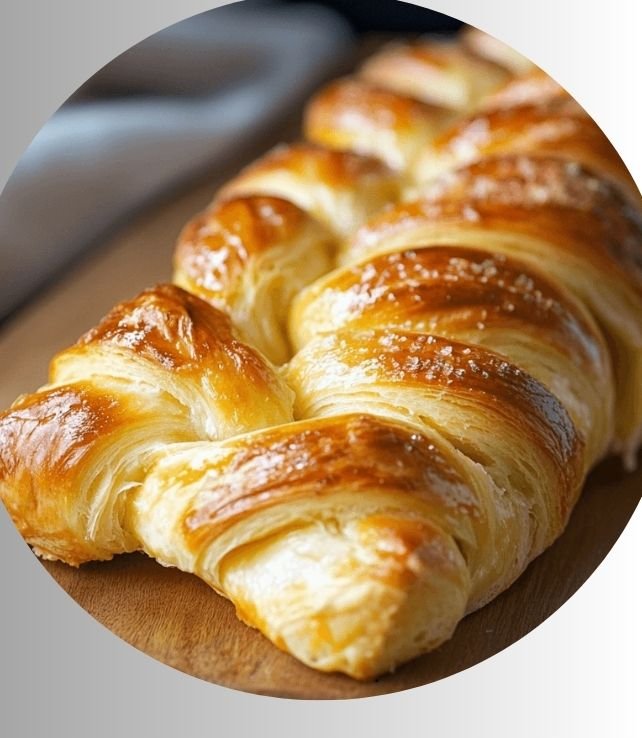
You have likely seen them at school fundraisers or holiday brunches: those long, golden, intricately woven pastries, often dripping with icing. For years, I assumed such a creation was strictly for professional bakers. The turning point came when I found my grandmother’s old recipe box, its cards stained with butter and vanilla.
Inside was a handwritten card titled “Sunday Braid,” with notes in the margin about proving times and oven temperatures. That discovery shifted my perspective from seeing it as a distant treat to understanding it as a tangible, achievable piece of baking craft. This recipe is that bridge.
Below, you will find a complete guide to making a butter braid from scratch. We will move through the precise formula, then explore the science of the ingredients, their nutritional roles, methods for adaptation, and the practical knowledge needed for consistent results.
How to Make Butter Braid Recipe
This process is a commitment to time and technique, divided into distinct phases: creating the dough, its first rise, shaping, a second rise, and finally, baking and finishing. Precision in measurement and patience during the proving stages are non-negotiable for the characteristic light, flaky layers.
Recipe Details
- Prep Time: 30 minutes (plus 3 hours for proving)
- Cook Time: 25 minutes
- Servings: 12
- Course: Breakfast, Dessert
- Cuisine: American
- Diet: Vegetarian
Ingredients
- 1 cup whole milk, warmed to 110°F
- 2 ¼ teaspoons (1 packet) active dry yeast
- ½ cup granulated sugar
- 4 ½ cups all-purpose flour, plus more for dusting
- 1 teaspoon salt
- 3 large eggs, at room temperature
- 1 teaspoon pure vanilla extract
- 1 cup (2 sticks) unsalted butter, softened
- 1 cup fruit preserves or pastry filling (like apple, cherry, or cream cheese)
- 1 cup powdered sugar
- 2 tablespoons milk or cream
- ½ teaspoon vanilla extract
Instructions
- In the bowl of a stand mixer, combine the warmed milk, yeast, and a pinch of the sugar. Let it sit for 5-7 minutes until foamy.
- Add the remaining sugar, 4 cups of flour, salt, eggs, and vanilla extract. Using the dough hook, mix on low speed until a shaggy dough forms.
- With the mixer running on low, add the softened butter one tablespoon at a time, allowing each piece to incorporate fully before adding the next. This will take about 5 minutes.
- Increase the speed to medium and mix for 5-7 minutes until the dough is smooth, elastic, and pulls away from the sides of the bowl. If it remains very sticky, add the remaining ½ cup of flour a tablespoon at a time.
- Place the dough in a lightly greased bowl, cover with plastic wrap, and let it rise in a warm place for 1.5 to 2 hours, or until doubled in size.
- Punch down the risen dough. On a lightly floured surface, roll it out into a 10×15-inch rectangle.
- Spread your chosen filling down the center third of the rectangle, lengthwise, leaving a 1-inch border at the top and bottom.
- Using a sharp knife or bench scraper, cut diagonal strips (about 1-inch wide) from the filling out to the edge on both sides.
- To braid, fold the top and bottom ends over the filling. Then, alternately fold the strips from each side over the filling, crossing them in the center. Transfer the braid to a parchment-lined baking sheet.
- Cover loosely and let rise for 45-60 minutes until puffy. Preheat your oven to 350°F during the last 20 minutes of this rise.
- Bake for 22-25 minutes, or until deeply golden brown. Transfer to a wire rack to cool completely.
- For the glaze, whisk together powdered sugar, milk or cream, and vanilla until smooth. Drizzle over the cooled braid.
Nutrition
- Calories: 480 kcal
- Protein: 7 g
- Fat: 21 g
- Carbohydrates: 66 g
- Sugar: 32 g
- Fiber: 1 g
- Sodium: 220 mg
- Cholesterol: 85 mg
Cooking Method
This is a yeast-leavened baked good. The primary cooking method is baking in a conventional oven, which sets the structure, creates browning through the Maillard reaction and caramelization, and evaporates surface moisture for a crisp exterior. The secondary, critical method is the mechanical action of kneading, which develops the gluten network to trap gas from yeast fermentation.
Tools Needed
- Stand mixer with dough hook attachment
- Large mixing bowl
- Rolling pin
- Parchment paper
- Rimmed baking sheet
- Wire cooling rack
- Kitchen scale (recommended for accuracy)
- Instant-read thermometer (for checking milk temperature)
The Science and Role of Core Ingredients
Each component in this formula has a specific functional purpose. Understanding these roles allows you to troubleshoot and adapt with confidence.
Flour: The Structural Framework
All-purpose flour provides a moderate protein content, typically 10-12%. This protein, primarily glutenin and gliadin, forms gluten when hydrated and kneaded. The developed gluten network is elastic and strong enough to stretch around the expanding carbon dioxide bubbles produced by the yeast, giving the braid its lofty height and chewy texture. Using bread flour would create a tougher crumb, while cake flour would lack the necessary strength.
Butter: Flavor, Texture, and Layering
Butter is not just a flavor agent; it is a structural element. When incorporated into the dough after gluten formation, it coats the gluten strands. This coating limits over-development and, more importantly, creates a water-in-fat emulsion. During baking, the water in the butter turns to steam, helping to separate the dough into tender, flaky layers. The milk solids in butter also contribute to browning and that distinct, rich taste.
Yeast: The Biological Leavener
Active dry yeast is a living organism. When activated in warm liquid with a bit of sugar, it begins to metabolize sugars, producing carbon dioxide gas and alcohol. The gas inflates the dough during the proving stages. The two rises are crucial: the first, or bulk fermentation, allows for flavor development as byproducts like organic acids accumulate. The second, or proof, readies the shaped dough for the oven, ensuring a light final product.
Eggs: Binding, Richness, and Color
Eggs serve multiple functions. The proteins coagulate during baking, providing additional structure and binding the crumb. The emulsifiers in the yolk, like lecithin, help create a stable, uniform dough. The fat in the yolk contributes to a tender mouthfeel and rich flavor, while also promoting a golden-brown crust.
Nutritional Perspective and Dietary Adaptations
As a prepared pastry, a butter braid is an energy-dense food. A single serving provides a significant amount of carbohydrates, primarily from refined flour and sugars, which offer quick energy. The fat content, largely from butter and eggs, contributes to satiety and carries fat-soluble flavors. The protein comes from the flour, eggs, and milk.
For those with dietary considerations, the formula can be modified. These changes will alter the texture and flavor profile, so adjustments in technique may be needed.
Gluten-Free Adaptation
Replace the all-purpose flour with a high-quality, cup-for-cup gluten-free flour blend that contains xanthan gum. Without gluten, the dough will be more like a thick batter. Chilling it before shaping is essential. Expect a denser, more crumbly result, as the structure will rely on starches and gums rather than gluten.
Dairy-Free and Vegan Adaptation
Use a plant-based milk and a vegan butter stick. For the eggs, a commercial egg replacer or a mix of 1 tablespoon ground flaxseed with 3 tablespoons water per egg can work. The braid may not rise as high due to the different protein structures, and the crust may be less golden. The filling must also be fruit-based or use a vegan cream cheese alternative.
Reduced-Sugar Variation
The sugar in the dough feeds the yeast and tenderizes the crumb. You can reduce the dough sugar by up to 25% without severely impacting rise. The greater reduction comes from the filling and glaze. Opt for a no-sugar-added fruit spread and either omit the glaze or make a thinner version with significantly less powdered sugar.
Historical Context and Modern Iterations
The concept of enriched, braided breads is ancient, with roots in European traditions like the Jewish challah or the Swiss Zopf. These were often celebratory breads, using precious ingredients like eggs and butter for special occasions. The modern American butter braid, often associated with fundraising, is a direct descendant.
It represents a simplification and standardization of those traditional techniques for home and community baking, emphasizing sweetness and a visually impressive, shareable form. Contemporary variations now include fillings like cinnamon sugar, almond paste, or savory options with cheese and herbs, demonstrating its adaptable foundation.
Common Mistakes and Methods for Success
Observing where attempts can go wrong provides a clear path to a better outcome.
Dough That Fails to Rise
This typically points to expired yeast or liquid that was too hot, which killed the yeast organisms. Always check the expiration date and use a thermometer to ensure your milk is between 105-110°F. The environment should be draft-free and warm, around 75-80°F.
Butter Leaking During Baking
This occurs if the butter was too soft or melted when incorporated, or if it was not fully enclosed during braiding. Your butter should be pliable but cool to the touch. When braiding, ensure the strips of dough are securely overlapping to create a sealed packet for the filling.
A Dense, Heavy Texture
This is usually the result of under-proofing or over-kneading. The dough must double in size during the first rise and become visibly puffy before baking. Over-kneading after the butter is added can break down the fat emulsion and toughen the gluten, leading to a tight crumb.
Pale, Undercooked Bottom
This is often a heat distribution issue. Use a light-colored, rimmed baking sheet. Placing the sheet on a lower oven rack can help, but watch the top to prevent over-browning. A pizza stone preheated on the oven floor can also radiate heat upward for a crisper base.
Serving, Storage, and Pairing Suggestions
A butter braid is best served at room temperature the day it is baked, when the texture is at its peak. The glaze should be applied after cooling to prevent it from melting into the pastry.
For storage, wrap the unglazed braid tightly in plastic wrap once completely cool. It will keep at room temperature for 2 days. For longer storage, freeze the wrapped, unglazed braid for up to 2 months. Thaw overnight at room temperature, then warm slightly in a 300°F oven for 5-10 minutes before glazing and serving.
In terms of pairing, its sweet richness contrasts well with bitter or acidic beverages. A black coffee, a strong espresso, or a tart black tea will balance the sweetness. For a brunch setting, it pairs suitably with savory egg dishes or fresh fruit to create a more complete meal.
Frequently Asked Questions
Can I make the dough ahead of time?
Yes. After the first rise, punch down the dough, wrap it tightly, and refrigerate for up to 24 hours. Let it sit at room temperature for 30 minutes before rolling, shaping, and proceeding with the second rise. This slow, cold fermentation can deepen the flavor.
My filling is leaking out. How can I prevent this?
Ensure your filling is not too runny. If using preserves, a thicker variety works best. Do not overfill the center channel. Most importantly, make sure your braid is tightly constructed, with the dough strips securely overlapping to fully encase the filling.
Why is my braid browning too quickly on top?
Ovens often have hot spots. If the top is browning too fast, tent the braid loosely with aluminum foil for the remainder of the baking time. Also, verify your oven temperature with a separate thermometer, as an oven running hot will accelerate browning.
Can I use instant yeast instead of active dry yeast?
You can. Instant yeast can be mixed directly with the dry ingredients. Use the same amount by volume. Because it is more vigorous, the rise times may be slightly shorter, so watch the dough’s size, not the clock.
What is the best way to reheat a butter braid?
To restore texture, reheat slices in a toaster oven or conventional oven at 325°F for 5-8 minutes. Avoid the microwave, as it will make the pastry soggy and tough by rapidly redistributing moisture.
How do I achieve a more pronounced, shiny crust?
For a darker, shinier crust, apply an egg wash before baking. Whisk one egg with a tablespoon of water or milk and brush it lightly over the risen braid just before it goes into the oven. The proteins and sugars in the wash promote browning and create a sheen.
