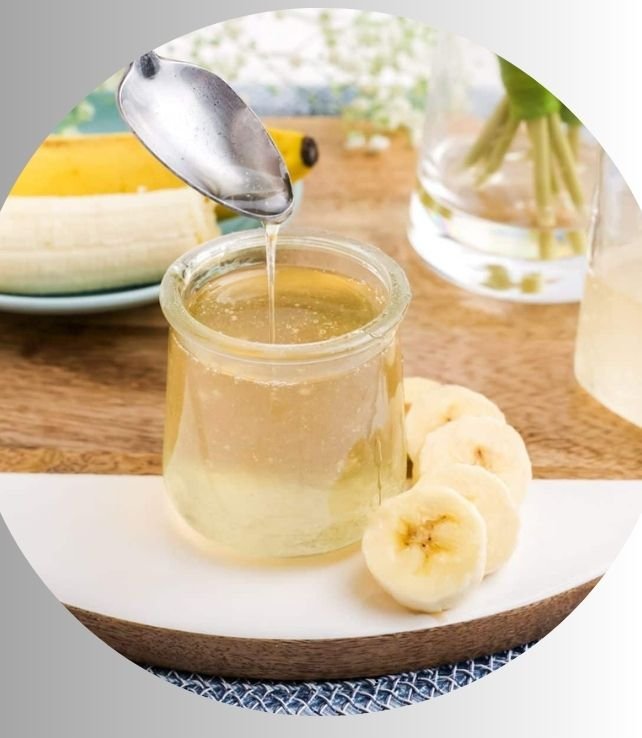
You have bananas turning brown on your counter. The standard choices are banana bread or the freezer, but there is a third, remarkably versatile option that transforms them into a liquid sweetener with deep, caramelized flavor. This is banana syrup.
I first encountered the concept not in a cookbook, but through necessity in my grandmother’s kitchen. Frugality was a practiced art, and wasting food was not an option. A batch of overripe bananas destined for the compost bowl instead became a simmering pot of golden-brown liquid that she used to sweeten her morning oatmeal and glaze weekend pancakes. That memory of resourcefulness and flavor has stayed with me, evolving from a kitchen trick into a staple ingredient I now analyze as a dietician and celebrate as a cook.
This recipe provides a method for creating a pure, concentrated syrup from bananas, water, and sugar. The process is straightforward, but the outcome is complex. It yields a thick, pourable syrup ideal for cocktails, coffee sweeteners, dessert toppings, and baking applications. Below, you will find the complete procedure, followed by a detailed examination of its components, nutritional profile, and the many ways it can be integrated into your cooking.
How to Make Banana Syrup Recipe
This process extracts the maximum sweetness and essence from ripe bananas. The key is a slow simmer that breaks down the fruit’s fibers and starches, followed by a reduction that concentrates the flavor into a syrup consistency.
Recipe Details
- Prep Time: 10 minutes
- Cook Time: 45 minutes
- Servings: Yields approximately 1 ½ cups of syrup
- Course: Condiment
- Cuisine: International
- Diet: Vegetarian, Gluten-Free
Ingredients
- 4 large very ripe bananas (brown speckled skin is ideal)
- 2 cups water
- 1 cup granulated white sugar
- 1 teaspoon pure vanilla extract (optional)
- 1 small pinch of fine sea salt
Instructions
- Peel the bananas and break them into 2-3 inch chunks. Place them in a medium-sized, heavy-bottomed saucepan.
- Add the water and sugar to the pan with the bananas. Use a wooden spoon to gently stir and help dissolve some of the sugar.
- Place the saucepan over medium-high heat and bring the mixture to a boil. Once boiling, immediately reduce the heat to maintain a gentle, steady simmer.
- Allow the mixture to simmer uncovered for 30 minutes. The bananas will become very soft and darken, and the liquid will turn a deep amber color. Stir occasionally to prevent sticking.
- After 30 minutes, remove the pan from the heat. Use a potato masher or the back of a fork to thoroughly mash the cooked banana pieces into the liquid until no large chunks remain.
- Place a fine-mesh strainer over a large bowl or measuring jug. Pour the entire banana mixture into the strainer. Use the back of a spoon to press firmly on the solids to extract all possible liquid. Discard the remaining pulp.
- Return the strained liquid to the cleaned saucepan. Bring it back to a simmer over medium heat and cook, stirring occasionally, for 10-15 minutes until the syrup has reduced slightly and coats the back of a spoon. It will thicken further as it cools.
- Remove from heat. Stir in the vanilla extract and pinch of salt, if using. Allow the syrup to cool completely before transferring to a clean glass jar or bottle for storage.
Nutrition
- Calories: 70 kcal
- Protein: 0.2 g
- Fat: 0.1 g
- Carbohydrates: 18 g
- Sugar: 16 g
- Fiber: 0.5 g
- Sodium: 5 mg
- Cholesterol: 0 mg
Nutritional information is an estimate per tablespoon, calculated using a standard database. Values can vary based on exact banana size and reduction level.
Cooking Method
The primary method used here is simmering and reduction. Simmering gently heats the mixture to break down pectin and cell walls in the banana, releasing sugars and flavor compounds into the water. The subsequent reduction phase, after straining, evaporates excess water through continued heating. This increases the concentration of dissolved sugars, primarily sucrose from the added sugar and fructose/glucose from the bananas, resulting in the viscous texture of a syrup.
Tools Needed
- Medium heavy-bottomed saucepan
- Wooden spoon or silicone spatula
- Fine-mesh strainer
- Bowl or large measuring jug
- Potato masher or fork
- Clean glass jar or bottle for storage
Ingredient Analysis and Selection
Each component in this formula plays a specific role. Understanding these roles allows for informed substitutions and predictable results.
The Role of Bananas: Ripeness and Variety
The banana is not just a flavoring agent; it is the foundational source of body and natural sweetness. As bananas ripen, their starch converts into simple sugars like glucose, fructose, and sucrose. A banana with a fully yellow peel with brown spots can be up to 20% sweeter than a completely yellow one.
This enzymatic process also develops the deeper, almost honey-like esters we associate with ripe banana aroma. Using underripe bananas will result in a less sweet syrup with a starchy, slightly astringent note. For this preparation, embrace blackening peels.
While Cavendish bananas are the common choice, other varieties can be used. Smaller, sweeter Lady Finger bananas may require a slight adjustment in quantity. Plantains, in their very ripe black stage, will produce a syrup with a more robust, less sweet flavor profile, suitable for savory applications.
Sweeteners: Beyond White Sugar
Granulated white sugar is standard because it dissolves cleanly and provides a neutral sweetness that allows the banana flavor to dominate. However, it is not the only option.
Brown sugar, with its molasses content, will add notes of caramel and butterscotch, creating a richer, more complex syrup. Coconut sugar will impart a similar caramel tone with a lower glycemic index, though it may slightly mute the pure banana taste. For a liquid sweetener base, you could substitute part of the water with pure maple syrup or honey, but be cautious during the reduction phase as these can burn more easily than granulated sugars.
Water, Salt, and Vanilla: The Flavor Enhancers
Water is the solvent that facilitates extraction. Using a measured amount ensures proper concentration. A pinch of salt is a powerful flavor amplifier, not to make the syrup salty, but to balance the sweetness and heighten the overall banana perception. Vanilla extract is listed as optional, but it acts as a flavor bridge. Its compounds complement and round out the fruity esters from the banana, creating a more harmonious and dessert-like profile. For a pure fruit expression, omit it.
Nutritional Breakdown and Dietary Perspective
From a dietary standpoint, this syrup is a concentrated source of energy in the form of simple carbohydrates. A primary tablespoon provides roughly 70 calories, almost exclusively from sugars. It contains negligible amounts of protein, fat, and micronutrients, though a small amount of potassium and vitamin B6 from the banana may remain.
This does not make it “unhealthy,” but it frames its use. It is a condiment, not a staple. The advantage over commercial pancake syrups, which are often high-fructose corn syrup with artificial flavor, is the use of a whole fruit and the control over sugar type and quantity. You know exactly what is in it.
As a dietician, I view it as a tool for enhancing the appeal of more nutrient-dense foods. A drizzle over plain Greek yogurt or whole-grain waffles can make those healthier options more palatable, potentially increasing their consumption. The goal is mindful application, not elimination.
Dietary Adaptations and Modifications
This recipe is inherently gluten-free and vegetarian. With a few adjustments, it can suit other dietary needs.
Vegan Adaptation
The base recipe is already vegan. Ensure any optional vanilla extract is pure and not processed with animal-derived glycerin if this is a concern.
Reduced-Sugar Version
For a lower-sugar alternative, you can reduce the added granulated sugar by half. Be aware that this will yield a thinner, less viscous final product because there is less total dissolved solid to create the syrup body. The flavor will be more directly of cooked banana, which is less sweet. You can also explore using a sugar substitute like allulose or monk fruit blend designed for baking, which will behave similarly to sugar in the reduction process.
Spiced and Infused Variations
During the initial simmer, consider adding a cinnamon stick, a few slices of fresh ginger, or a couple of whole cloves. These should be removed during the straining process. For a citrus note, add a strip of lemon or orange zest to the pot.
Cultural and Historical Context of Fruit Syrups
While not tied to one specific culture, the practice of creating syrups from fruit is a global and historical method of preservation. Before modern refrigeration, reducing fruit with sugar was a reliable way to capture seasonal flavors and extend their usability well beyond harvest.
In the Caribbean, a similar concept exists with “banana fig,” where ripe bananas are slowly cooked down into a thick paste. In American soda fountain history, fruit syrups were the essential building blocks for flavored sodas and phosphates. This banana version fits into that broad tradition of homemade, resourceful pantry staples. It is a modern take on an old principle: use what you have, waste nothing, and create something delicious in the process.
Common Mistakes and Expert Tips for Perfection
Avoiding a few key errors will ensure a clear, flavorful syrup every time.
Preventing a Cloudy or Gummy Syrup
Cloudiness often comes from incomplete straining or over-pressing of the pulp. Press firmly to extract liquid, but avoid forcing the thick, starchy pulp through the mesh. Using a cheesecloth-lined strainer can provide an even clearer filtration. A gummy texture can result from overcooking the initial banana mixture, causing excessive pectin release. Stick to the recommended simmering time.
Managing the Reduction
Do not rush the reduction after straining. A rapid boil can lead to caramelization of the sugars too quickly, creating a bitter taste. A steady, gentle simmer allows for controlled water evaporation. The syrup is ready when it leaves a clear, thin coat on a spoon that you can run your finger through.
Storage and Shelf Life
Always store the cooled syrup in a clean, airtight container in the refrigerator. Due to its high sugar content, it is resistant to spoilage but can ferment or develop mold if contaminated. Properly stored, it will keep for 3-4 weeks. You can also freeze it in ice cube trays for longer storage, then thaw cubes as needed.
Serving, Pairing, and Practical Applications
The use of this syrup extends far beyond pancakes.
Beverage Sweetener
It is exceptional in coffee, lattes, and chai tea, adding a distinct flavor that plain sugar cannot. It forms the base for unique cocktails like a Banana Old Fashioned or daiquiri variations. Stir it into plain milk or milk alternatives for a quick flavored drink.
Breakfast and Dessert Uses
Drizzle over waffles, French toast, oatmeal, or yogurt. Warm it slightly to make it more pourable. Use it as a glaze for cakes, a topping for ice cream, or a swirl-in for cheesecake batter. It can be brushed on sponge cakes to add moisture.
Savory and Culinary Applications
Thin a small amount with vinegar or citrus juice to create a vinaigrette for fruit salads or greens with goat cheese. Use it as a glaze for baked ham or pork tenderloin during the last 10 minutes of roasting. Incorporate it into a barbecue sauce for a touch of fruity sweetness.
The Science of Syrup Formation
The transformation from watery banana mixture to thick syrup is a physical process governed by sugar concentration. When sugar dissolves in water, it forms a solution. Heating this solution evaporates the water molecules, leaving a higher ratio of sugar molecules to remaining water.
This increased concentration increases the solution’s density and viscosity—its thickness. The natural pectin and soluble fibers from the banana also contribute minimally to this body. The final stage is a supersaturated solution that remains liquid due to the presence of other compounds and the prevention of sugar crystal formation (interfered with by the fruit’s acids and other solids).
Frequently Asked Questions
Can I use frozen bananas for this syrup?
Yes, frozen then thawed bananas work very well. They often have an even softer texture, which can aid in breakdown. Ensure they are fully thawed and drain any excess liquid before starting the recipe.
Why is my banana syrup separating in the jar?
A slight separation is normal, especially if stored for a while. The denser sugar solution can settle. Simply give the jar a good shake or stir before use. If separation is severe, it may indicate insufficient reduction or sugar content.
Can I make this syrup without any added sugar?
You can simmer bananas in water alone, strain, and reduce the liquid. The result will be a thin, mildly sweet banana-infused water, not a true syrup. The lack of added sugar means it will not achieve a viscous, pourable consistency and will have a much shorter refrigerator shelf life.
What can I do with the leftover banana pulp after straining?
The pulp is quite cooked and bland, but it can be added to muffin or quick bread batter for extra moisture and a subtle banana flavor. It can also be composted.
My syrup crystallized in the jar. How can I fix it?
Sugar crystallization can occur. To remedy, gently reheat the syrup in a saucepan with a tablespoon of water over low heat, stirring until the crystals fully dissolve. Allow it to cool before storing again.
Is this syrup suitable for canning or shelf-stable storage?
I do not recommend standard water-bath canning for this recipe without precise pH testing and a validated recipe from a food preservation authority. The sugar content is high, but the natural acidity of bananas can vary. For safety, treat it as a refrigerated preserve.
How does this compare to store-bought banana flavoring?
Commercial banana flavoring, like isoamyl acetate, replicates the single, dominant ester of the Cavendish banana. This homemade version provides a broader, more rounded flavor profile that includes caramelized sugar notes and the full, cooked fruit taste, without artificial ingredients.
Can I double this recipe?
You can double or triple the ingredients. Use a larger, wide pot to allow for efficient evaporation during the reduction phase. The cooking times, particularly for the reduction, may increase slightly.