There is a specific scent that defines the holidays for many of us. It’s not just the turkey or the pies. It’s the warm, savory, herbaceous aroma of stuffing baking in the oven. For decades, one name has been synonymous with that foundational flavor: Mrs. Cubbison’s.
If you have a box of Mrs. Cubbison’s seasoned stuffing mix in your pantry, you hold more than just bread cubes and herbs. You hold a piece of American culinary tradition. But the instructions on the box are just a starting point. As a dietitian and culinary historian, I view that box as a blueprint, a reliable foundation upon which we can build something truly memorable, tailored to our health and our taste.
Today, I’m going to guide you through the classic preparation, then we’ll explore its history, its nutrition, and how to make it your own. This isn’t just about following steps; it’s about understanding the “why” behind each one, empowering you to create a side dish that might just become the main event.
How to Make Mrs. Cubbison’s Stuffing Recipe
This is the standard, time-tested method for preparing Mrs. Cubbison’s stuffing as a side dish, baked separately in a casserole dish. It yields a stuffing that is moist on the inside with a delightfully crisp top. I’ve made this exact version countless times, and it never fails to deliver consistency and comfort.
Recipe Details
- Prep Time: 20 minutes
- Cook Time: 45 minutes
- Servings: 10-12
- Course: Side Dish
- Cuisine: American
- Diet: Vegetarian (contains dairy; see adaptations for vegan)
Ingredients
- 1 (12-ounce) package Mrs. Cubbison’s Seasoned Stuffing (Classic or Herb Seasoned)
- 1 cup (2 sticks) unsalted butter
- 2 cups finely chopped yellow onion (about 1 large onion)
- 2 cups finely chopped celery (about 4-5 stalks)
- 2 ½ cups vegetable or chicken broth, warmed
- 2 large eggs, lightly beaten
- 1 teaspoon poultry seasoning (optional, for extra depth)
- ½ teaspoon freshly ground black pepper
Instructions
- Preheat your oven to 325°F (163°C). Grease a 9×13 inch baking dish or a 3-quart casserole dish with butter or non-stick spray.
- Open the package of Mrs. Cubbison’s stuffing and pour the bread cubes into a very large mixing bowl. Set aside.
- In a large skillet or Dutch oven over medium heat, melt the butter. Add the chopped onion and celery. Cook, stirring frequently, until the vegetables are very soft and translucent, about 10-12 minutes. Do not brown them; the goal is to soften and sweeten them.
- Pour the entire contents of the skillet—the melted butter and softened vegetables—over the bread cubes in the mixing bowl. Gently toss to combine, ensuring the bread is evenly coated with the buttery mixture.
- In a separate bowl or measuring cup, whisk the warm broth with the beaten eggs, optional poultry seasoning, and black pepper.
- Gradually pour the broth mixture over the bread and vegetable blend. Using a large spoon or your hands, fold and mix thoroughly until all the liquid is absorbed and the ingredients are uniformly moistened.
- Transfer the moistened stuffing mixture to your prepared baking dish. Spread it out evenly and press down lightly.
- Cover the dish tightly with aluminum foil. Bake in the preheated oven for 30 minutes.
- After 30 minutes, carefully remove the foil. Continue baking, uncovered, for an additional 15-20 minutes, or until the top is golden brown and crisp.
- Remove from the oven and let it rest for 10 minutes before serving. This allows the stuffing to set, making it easier to scoop.
Nutrition
- Calories: 285 kcal
- Protein: 5 g
- Fat: 18 g
- Carbohydrates: 26 g
- Sugar: 3 g
- Fiber: 2 g
- Sodium: 480 mg
- Cholesterol: 75 mg
Note: Nutritional data is an estimate per serving based on the standard recipe and can vary significantly with ingredient swaps.
Cooking Method
This recipe uses the baked casserole method. The initial covered baking phase allows the stuffing to steam and heat through completely without drying out. The final uncovered phase is crucial for creating texture, driving off excess surface moisture, and encouraging the Maillard reaction—the chemical process that creates complex, savory flavors and that desirable golden-brown crust.
Tools Needed
- Large mixing bowl
- Large skillet or Dutch oven
- Cutting board and chef’s knife
- Measuring cups and spoons
- 9×13 inch baking dish or 3-quart casserole
- Aluminum foil
The Story in the Box: A Brief History of Mrs. Cubbison’s
Before we deconstruct the ingredients, we should appreciate their origin. The story begins with Sophie Cubbison, a home economist in Los Angeles in the 1920s. After her husband’s passing, she needed to support her family. She began selling a unique product: dried, seasoned bread cubes for stuffing.
Her innovation was twofold. First, she used the ends of sourdough bread loaves from San Francisco, a resourceful way to prevent waste. Second, she pre-mixed a proprietary blend of dried herbs and seasonings. She offered not just an ingredient, but a solution—a way for home cooks to achieve consistent, flavorful results without toasting and seasoning bread themselves.
Her business grew from her kitchen to a national brand. When you use Mrs. Cubbison’s, you are participating in a nearly century-old tradition of convenience and quality. It represents a pivotal moment in American food history, bridging the gap between from-scratch home cooking and the emerging world of packaged food aids.
Ingredient Analysis: Building Flavor and Function
Every component in this recipe has a specific role. Understanding these roles allows you to make informed substitutions and improvements.
The Foundation: Mrs. Cubbison’s Seasoned Cubes
The packaged cubes are more than just dried bread. They are typically made from enriched wheat flour, yeast, sugar, and salt, then baked, dried, and coated with a blend that includes sage, thyme, marjoram, onion, and celery. The drying process is key—it creates a stable product that can absorb a significant amount of liquid without disintegrating, which is essential for the texture of the final dish.
The Aromatic Base: Onions and Celery
This duo is non-negotiable in traditional American stuffing. Onions provide a sweet, pungent foundation, while celery offers a distinct, slightly bitter, aromatic quality and crucial textural contrast. Cooking them slowly in butter is called “sweating.” This process breaks down their cell walls, releasing moisture and converting their sharp flavors into a sweet, mellow, and deeply savory base that permeates every bite.
The Fat: Butter
Butter serves multiple functions. It is the cooking medium for the vegetables, it coats the bread cubes to help inhibit sogginess and promote browning, and it contributes a rich, creamy flavor that water or oil cannot match. The milk solids in butter also participate in browning, adding nutty notes.
The Binder: Broth and Eggs
The warm broth rehydrates the desiccated bread cubes. Using warmed broth prevents the fat in the mixture from solidifying upon contact. The eggs are the primary binder. As they cook, the egg proteins coagulate, forming a network that holds the stuffing together, giving it structure so it can be sliced or scooped, rather than crumbling into a pile of separate cubes.
Nutritional Perspective: Balancing Tradition and Well-being
As a dietitian, I approach traditional recipes with a lens of understanding, not deprivation. Holiday meals are about more than micronutrients; they are about culture and connection. The goal is to enjoy these foods mindfully and understand their composition.
The standard recipe is energy-dense, providing calories primarily from carbohydrates (the bread) and fats (the butter). The sodium content is notable, coming from the seasoned bread cubes, broth, and added butter. The vegetables contribute some fiber, vitamins A and C, and potassium, but their volume is relatively small compared to the bread base.
This doesn’t make it a “bad” food. It makes it a celebratory food. The key is portion awareness and balancing your plate with other, less dense items like roasted vegetables or a simple green salad. The recipe also offers clear avenues for modification if you have specific dietary goals, which we will address next.
Dietary Adaptations and Creative Variations
The classic recipe is a template. Here is how you can modify it to meet various dietary needs or simply to explore new flavors.
For a Vegan Stuffing
Replace the butter with an equal amount of high-quality vegan butter or extra-virgin olive oil. Substitute the eggs with a “flax egg” (1 tbsp ground flaxseed mixed with 2.5 tbsp water per egg, let sit 5 minutes) or ¼ cup of unsweetened applesauce per egg for binding. Use a robust vegetable broth. The texture will be slightly less firm but still delicious.
For a Gluten-Free Stuffing
Mrs. Cubbison’s does not make a gluten-free product. You will need to start with about 12 ounces of gluten-free bread, cut into ½-inch cubes and dried in a low oven. For seasoning, mix 1 ½ teaspoons dried sage, 1 teaspoon each of dried thyme and marjoram, ¾ teaspoon onion powder, and ½ teaspoon celery salt. Use this blend in place of the packaged seasoning.
Lower-Sodium Version
Use unsalted butter. Look for a no-salt-added or low-sodium vegetable broth. You can also dilute regular broth with water. Omit the optional poultry seasoning if it contains salt. The seasoned cubes will still contribute sodium, but these swaps can reduce the total by 30-40%.
Flavor Variations
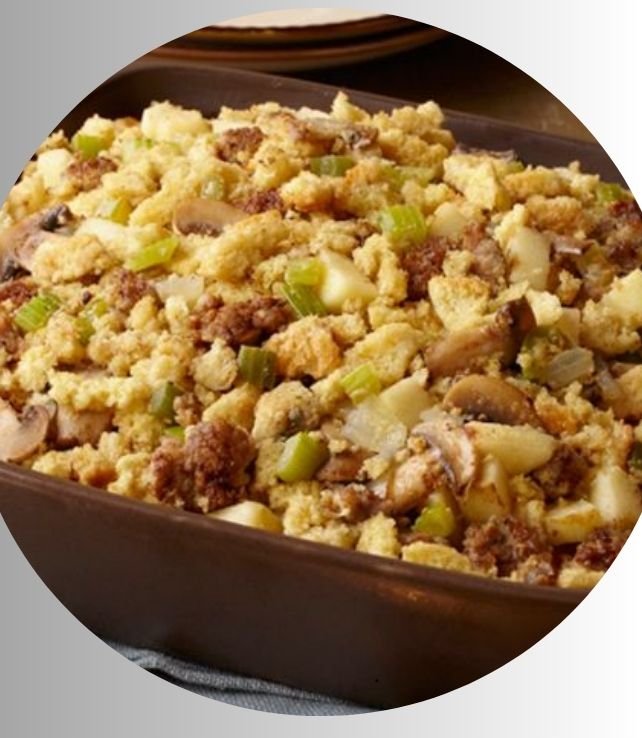
- Sausage & Apple: Brown 1 pound of bulk breakfast sausage (mild or sage) in the skillet before adding the butter and vegetables. Remove the sausage, leaving the fat, and proceed. Stir the cooked sausage and 1 ½ cups of diced, peeled tart apple (like Granny Smith) into the mixture before baking.
- Mushroom & Herb: Add 8 ounces of finely chopped cremini mushrooms to the skillet with the onions and celery. Cook until their liquid evaporates. Stir in 2 tablespoons of fresh chopped parsley and 1 tablespoon of fresh chopped rosemary with the broth.
- Cornbread Style: Use one package of Mrs. Cubbison’s Cornbread Stuffing mix. Consider adding diced roasted poblano peppers and a pinch of smoked paprika to the vegetable sauté.
Common Mistakes and How to Avoid Them
After years of testing and teaching, I’ve identified the pitfalls that can lead to less-than-perfect results.
1. Soggy or Dry Stuffing
The moisture balance is critical. Sogginess often comes from using cold broth, which doesn’t absorb as well, or not letting the mixture sit for 5 minutes after combining to allow full absorption before judging. Dryness is usually from under-measuring broth or over-baking uncovered. The bread should feel like a well-wrung sponge—moist but not dripping.
2. Underseasoned Flavor
The seasoned cubes provide a base, but they are designed for versatility. The vegetables cooked in butter are your primary flavor layer. If you skip the sauté or rush it, you miss this depth. Always taste the mixture before baking (the eggs are raw, but you can taste the broth-soaked bread). It should taste slightly over-seasoned, as baking mellows flavors.
3. Dense, Packed Texture
When transferring to the baking dish, gently spoon it in and lightly pat it down. Do not pack it tightly. You want some air pockets to remain so the heat can circulate, creating a lighter, more varied texture with both soft and crisp parts.
4. Burning the Top
Ovens vary. If your top is browning too quickly during the uncovered phase, simply lay a piece of foil loosely over the top. The goal is a deep golden brown, not black.
Serving, Pairing, and Storage Guidance
Serving Suggestions
This stuffing is the quintessential partner for roasted turkey and gravy. The savory notes complement the poultry perfectly. It also pairs wonderfully with roasted chicken, pork chops, or even a hearty lentil loaf for a vegetarian centerpiece. A bright, acidic side like cranberry sauce or a tart green salad cuts through the richness beautifully.
Storage and Reheating
Store leftover stuffing in an airtight container in the refrigerator for up to 4 days. For longer storage, freeze it for up to 3 months. The best method for reheating is in the oven. Place the stuffing in an oven-safe dish, sprinkle with a tablespoon or two of broth to reintroduce moisture, cover with foil, and bake at 325°F until heated through (about 20-30 minutes). For a crisp top, remove the foil for the last 10 minutes. Microwave reheating is possible but often leads to a rubbery texture.
Food Safety Note
Because this recipe contains eggs, it is important to handle it safely. Do not leave the baked stuffing at room temperature for more than 2 hours. Refrigerate promptly. When reheating, ensure the internal temperature reaches 165°F as measured by a food thermometer.
Frequently Asked Questions
Can I make Mrs. Cubbison’s stuffing ahead of time?
Yes, you can prepare it up to 24 hours in advance. Complete steps 1-6, mixing the ingredients thoroughly. Instead of baking, cover the bowl tightly with plastic wrap and refrigerate. When ready to cook, let it sit at room temperature for 30 minutes, then transfer to your baking dish and bake as directed. You may need to add 5-10 minutes to the covered baking time since it will be starting from cold.
What’s the difference between stuffing and dressing?
The terms are often used interchangeably, but technically, “stuffing” is cooked inside the cavity of a bird, while “dressing” is baked separately in a dish. Due to food safety concerns about even cooking, most food authorities recommend the baking dish method, which is what this recipe outlines.
Can I use water instead of broth?
You can, but I do not recommend it. Broth provides a foundational layer of savory flavor (umami) that water lacks. The result with water will be noticeably blander. For the best flavor, use a good-quality, low-sodium broth.
Why are my bread cubes still hard after baking?
This indicates insufficient liquid absorption. Ensure your broth is warm, not cold. After mixing, let the combined ingredients sit for a full 5-10 minutes, giving the dry cubes time to fully hydrate before you transfer them to the baking dish. Also, check that your oven temperature is accurate with an oven thermometer.
How can I make my stuffing more moist?
If you prefer a very moist, almost spoon-bread-like consistency, you can increase the broth by ¼ to ½ cup. Add it gradually after the initial mix rests. Remember, the eggs also contribute to a moist, cohesive texture, so ensure they are well incorporated.
Is Mrs. Cubbison’s stuffing mix vegetarian?
The Classic and Herb Seasoned varieties are vegetarian, as they do not contain meat products. However, they do contain dairy (whey) and eggs. Always check the specific product label, as formulations can change, and varieties like “Chicken Flavored” may contain animal-derived ingredients.
Can I add nuts or dried fruit?
Absolutely. Toasted pecans, walnuts, or chestnuts add wonderful crunch and richness. Dried cranberries, cherries, or apricots provide sweet-tart contrast. Add up to 1 ½ cups total of mix-ins. Stir them in during the final mixing stage, just before transferring to the baking dish.