You have a holiday brunch to host, and the expectation for something special is high. A standard cinnamon roll feels too simple, but a complex pastry feels like a project you don’t have time for. I faced this exact dilemma last December, standing in my kitchen with a bag of flour and a desire to create something that looked stunning but was built on a familiar, reliable foundation.
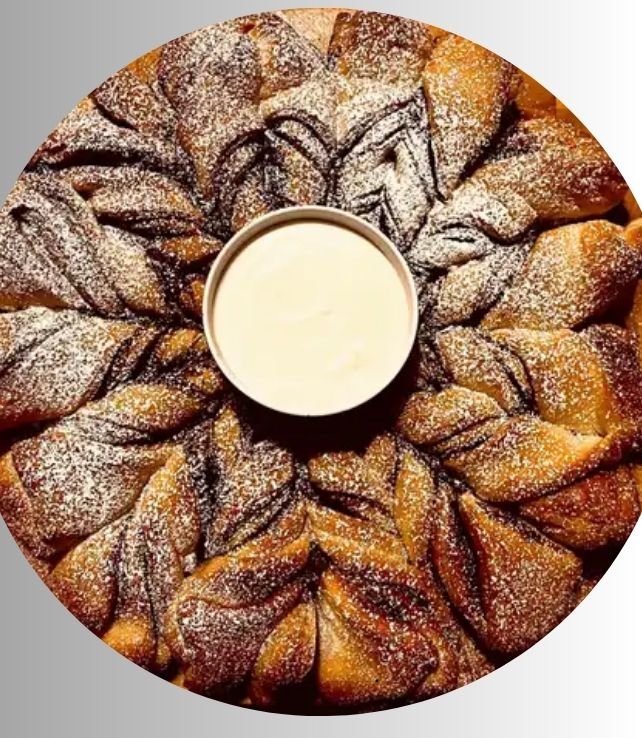
The solution is this Cinnamon Roll Snowflake. It is a show-stopping centerpiece that uses the same dough and filling as a classic cinnamon roll, but through a specific cutting and shaping technique, it transforms into a beautiful, pull-apart wreath that resembles a snowflake. This recipe provides that perfect balance of impressive presentation and achievable baking. I will guide you through each step, from the science of the yeast to the final drizzle, ensuring your result is both beautiful and delicious.
The Foundation: Understanding the Dough
This recipe’s success hinges on its dough. Unlike a quick bread, this is a yeasted, enriched dough, meaning it contains fat, sugar, and eggs. These ingredients tenderize the crumb and create a soft, pillowy texture, but they also slow down yeast activity. Understanding this balance is key.
Flour Power: Choosing Your Base
All-purpose flour is the ideal choice here. Its moderate protein content (typically 10-12%) provides enough gluten structure to trap the gases from the yeast, allowing the dough to rise and hold its intricate shape, without becoming too chewy. Bread flour, with higher protein, can make the dough tough if overworked, while cake flour lacks the necessary strength.
The Role of Fats: Butter vs. Shortening
I use unsalted butter. Butter contributes flavor and, due to its water content, creates steam during baking which aids in lift. For a dairy-free version, a plant-based butter that bakes similarly can be used. While shortening creates a very tender crumb, it lacks the distinct, rich flavor that butter imparts, which is central to the cinnamon roll experience.
Yeast: The Living Leavener
Instant yeast is my recommendation. It can be mixed directly with the dry ingredients, skipping the “proofing in water” step required by active dry yeast. Ensure your yeast is fresh; old yeast will result in a dense snowflake. The warm milk and sugar in the dough activate the yeast, which feeds on the sugars and produces carbon dioxide, causing the dough to expand.
How to Make Cinnamon Roll Snowflake Recipe
Follow these steps in order. The process requires time for the dough to rise, so plan accordingly. The shaping may seem detailed, but I will break it down with clarity.
Recipe Details
- Prep Time: 1 hour 30 minutes (plus 2 hours rising)
- Cook Time: 25 minutes
- Servings: 10-12
- Course: Breakfast, Brunch, Dessert
- Cuisine: American
- Diet: Vegetarian
Ingredients
- For the Dough:
- 1 cup whole milk, warmed to about 110°F
- 2 ¼ teaspoons instant yeast (one standard packet)
- ½ cup granulated sugar
- 2 large eggs, at room temperature
- ½ cup unsalted butter, melted and slightly cooled
- 1 teaspoon fine sea salt
- 4 ½ cups all-purpose flour, plus more for dusting
- For the Filling:
- ¾ cup packed light brown sugar
- 2 tablespoons ground cinnamon
- ¼ teaspoon ground nutmeg (optional)
- ¼ cup unsalted butter, very soft
- For the Icing:
- 4 ounces full-fat cream cheese, softened
- 1 cup powdered sugar, sifted
- 1 teaspoon pure vanilla extract
- 2-3 tablespoons milk or heavy cream
Instructions
- In the bowl of a stand mixer fitted with a dough hook, combine the warm milk, yeast, and sugar. Let it sit for 5 minutes until slightly frothy.
- Add the eggs, melted butter, and salt. Mix on low speed until combined.
- With the mixer running on low, add the flour one cup at a time until a shaggy dough forms. Increase speed to medium and knead for 6-8 minutes until the dough is smooth, elastic, and pulls away from the sides of the bowl. The dough will be slightly sticky.
- Place the dough in a lightly greased bowl, turning to coat. Cover with a clean kitchen towel or plastic wrap and let rise in a warm, draft-free place for 1 to 1.5 hours, or until doubled in size.
- While the dough rises, make the filling. In a small bowl, mix the brown sugar, cinnamon, and nutmeg. Set aside.
- Punch down the risen dough. Turn it out onto a lightly floured surface. Roll it into a large rectangle, about 24×16 inches.
- Spread the ¼ cup of very soft butter evenly over the entire surface of the dough. Sprinkle the cinnamon-sugar mixture evenly over the butter, leaving a ½-inch border along one long edge.
- Starting with the long edge opposite the clean border, tightly roll the dough into a log. Pinch the clean edge to seal the seam.
- Using a sharp knife or bench scraper, cut the log in half lengthwise, exposing the layers of filling. You will have two long halves.
- With the cut sides facing up, carefully twist the two halves together, keeping the layers visible. Form this twisted rope into a circle on a large parchment-lined baking sheet, pinching the ends together to seal the wreath shape.
- Using kitchen shears, make cuts around the outer edge of the circle, about 1-1.5 inches apart and cutting 2/3 of the way toward the center. There should be 12-16 segments.
- Gently twist each segment outward so the cut side faces up, creating the points of the snowflake. Cover loosely and let rise for 45 minutes. Preheat your oven to 350°F (175°C) during the last 15 minutes of this rise.
- Bake for 22-27 minutes, or until the snowflake is golden brown and the center is set. Transfer the baking sheet to a wire rack.
- While the snowflake cools slightly, make the icing. Beat the cream cheese until smooth. Add the powdered sugar and vanilla, then beat again. Add milk one tablespoon at a time until you reach a thick but pourable consistency.
- Drizzle the icing over the warm snowflake. Serve warm or at room temperature.
Nutrition
- Calories: 520 kcal
- Protein: 8 g
- Fat: 20 g
- Carbohydrates: 78 g
- Sugar: 38 g
- Fiber: 2 g
- Sodium: 280 mg
- Cholesterol: 85 mg
*Nutritional information is an estimate per serving based on 12 servings.
Cooking Method
This recipe uses the creaming method for the dough via a stand mixer, followed by hand-rolling, shaping, and finally baking in a conventional oven. The key stages are the two rises (bulk fermentation and proofing) and the specific cutting technique to create the snowflake shape.
Tools Needed
- Stand mixer with dough hook (optional but recommended)
- Large mixing bowls
- Rolling pin
- Parchment paper
- Large baking sheet (half-sheet pan)
- Sharp knife or bench scraper
- Kitchen shears
- Wire cooling rack
- Measuring cups and spoons
Nutritional Perspective on a Festive Treat
As a dietician, I view recipes through a lens of balance and understanding. This cinnamon roll snowflake is a celebratory food. One serving provides a notable amount of energy from carbohydrates, which is useful for a active morning, and a moderate amount of fat, primarily from butter, which contributes to satiety. The sugar content is significant, as expected in a pastry.
The value here lies in the experience and the intentionality of consumption. It is a shared centerpiece, not an everyday item. The recipe itself offers levers you can adjust based on dietary needs, which I will detail next. From a micronutrient standpoint, the cinnamon provides antioxidants like polyphenols, and using whole milk and cream cheese adds some calcium and vitamin A.
Adapting the Recipe for Dietary Needs
This dough is versatile and can be modified successfully. The key is to substitute one element at a time to understand how it changes the texture.
Gluten-Free Adaptation
Swap the all-purpose flour for a 1:1 gluten-free baking blend that contains xanthan gum. Brands like Bob’s Red Mill or King Arthur work well. The dough may be stickier, so chill it for 30 minutes before rolling to make handling easier. The rise may be slightly less pronounced.
Dairy-Free and Vegan Adaptation
Use a plant-based milk (soy or oat milk work best) and a vegan butter stick. For the eggs, a commercial egg replacer or a flax egg (1 tbsp ground flax + 2.5 tbsp water per egg) can be used, though the crumb may be denser. The filling butter can be replaced with more vegan butter. For the icing, use vegan cream cheese and a plant-based milk.
Lower-Sugar Variation
Reduce the sugar in the dough to ¼ cup. For the filling, you can decrease the brown sugar to ½ cup and add 2 tablespoons of a sugar substitute like monk fruit or erythritol that measures like sugar. The icing can be made with a powdered sugar alternative, though the texture and melting properties may differ.
The Story of Shaped Breads: A Brief History
The concept of shaping enriched dough into decorative forms is ancient and global. From Jewish challah to Scandinavian julekake, communities have used braiding and twisting to turn daily bread into symbolic celebration bread. The American cinnamon roll has direct lineage from Swedish kanelbulle, which itself is a descendant of German and Austrian sweet bread traditions.
This snowflake shape is a modern, festive twist on that lineage. It utilizes the same logic as a “monkey bread” or pull-apart wreath, designed for sharing and visual appeal. It transforms a personal pastry into a communal one, fitting for gatherings where food is both sustenance and spectacle.
Expert Tips to Guarantee Your Success
After making this countless times, I have identified the common hurdles and how to clear them effortlessly.
Dough is Too Sticky or Too Dry
Flour hydration can vary. If the dough remains very sticky after the kneading time, add one additional tablespoon of flour at a time until it becomes manageable. If it seems dry and won’t come together, add a teaspoon of warm milk. The ideal dough should be soft and slightly tacky, but not stick to your clean finger when pressed.
Preventing a Dense Snowflake
A dense result usually points to old yeast, liquid that was too hot and killed the yeast, or an insufficient rise. Ensure your milk is warm, not hot, to the touch. Let the dough rise in a warm spot. If your kitchen is cool, place the bowl in an oven with only the light on. Do not rush the proofing stage; the shaped snowflake should look puffy before baking.
The Perfect Cut and Twist
Use sharp kitchen shears for clean cuts. When twisting the segments outward, support the base of the segment with one hand while twisting with the other to prevent tearing. If a piece does tear, simply press it back into place; the final bake will often hide minor imperfections.
Oven Temperature Accuracy
Oven thermostats can be inaccurate. I recommend using an inexpensive oven thermometer. Baking at too low a temperature will cause the snowflake to dry out; too high, and the outside will brown before the center is baked through.
Serving, Storage, and Making Ahead
This pastry is best served the day it is made, ideally within a few hours of baking. The icing should be applied while it is still warm so it melts slightly into the crevices.
For storage, keep any leftovers in an airtight container at room temperature for up to 2 days. You can gently reheat individual portions in the microwave for 10-15 seconds. To freeze, bake and cool the snowflake without the icing. Wrap it tightly in plastic wrap and then foil. Freeze for up to 2 months. Thaw overnight at room temperature, warm in a 300°F oven for 10 minutes, then add the icing.
For a seamless brunch, you can prepare the dough the night before. After the first rise, punch it down, cover the bowl tightly, and refrigerate overnight. The next morning, let it sit at room temperature for 30 minutes, then proceed with rolling, shaping, and the second rise. This slow, cold fermentation can actually deepen the flavor.
The Science of the Twist
Why cut the log in half and twist it? This technique serves two purposes. First, it creates many more exposed layers of the cinnamon filling, distributing it throughout the entire snowflake rather than just in a spiral. Second, the twisting gives the final wreath structural integrity, helping it hold its circular shape during the final rise and bake. The gluten network you developed during kneading is strong enough to allow this manipulation without falling apart.
Frequently Asked Questions
Can I make the dough by hand without a stand mixer?
Yes. After combining the wet and dry ingredients in a bowl, turn the shaggy dough onto a floured surface and knead by hand for 10-12 minutes until smooth and elastic. This provides more control and is a good way to feel the dough’s texture development.
My snowflake spread out too much during baking. How can I prevent this?
This indicates the dough was slightly under-proofed or the gluten was over-developed during shaping, causing it to snap back and then collapse. Ensure your final proof is adequate—the dough should not spring back immediately when gently poked. Also, avoid over-flouring during rolling, as this can add excess dry flour that weakens the structure.
What can I use instead of cream cheese for the icing?
A simple glaze of powdered sugar, milk, and vanilla works. For a dairy-free version, a mixture of powdered sugar and a plant-based milk with a little vegan butter melted in will create a similar consistency.
Can I add nuts or raisins to the filling?
Absolutely. Chopped pecans or walnuts, or a layer of plump raisins, can be sprinkled over the cinnamon-sugar mixture before rolling. Press them in lightly so they adhere to the butter.
How do I know when the snowflake is fully baked?
The top will be a deep golden brown. The most reliable test is to check the internal temperature at the thickest part of the wreath using an instant-read thermometer; it should register between 190°F and 200°F (88°C to 93°C).
Can I use this method with store-bought cinnamon roll dough?
You can, though the results will differ. Use two cans of refrigerated cinnamon roll dough. Separate the rolls and arrange them in a circle on the pan, slightly touching. Use shears to cut and shape them similarly. Follow the bake time on the can’s instructions. The texture will be that of the prepared product, not a from-scratch yeast dough.
Why did my icing melt and disappear into the snowflake?
The pastry was likely too hot when you applied the icing. Let it cool on the pan for at least 15-20 minutes so the surface is warm but not steaming hot. This allows the icing to set on contact rather than immediately liquefying.