There is a specific shade of purple that appears for only a few weeks each spring, a color that carries a fragrance so potent it can stop you in your tracks. For me, that color and scent are forever linked to my grandmother’s backyard, a place where the lilac bushes were so old and established they formed a fragrant wall of blooms.
I remember standing beside them as a child, the clusters of tiny flowers brushing against my cheek, and the promise of the jelly she would make. That jelly was more than a spread; it was the taste of spring itself, captured in a jar. Today, I want to guide you through the process of creating that same experience in your own home.
This lilac jelly recipe transforms the delicate, aromatic blossoms into a clear, jewel-toned preserve. The final product has a subtle floral taste that is both surprising and delightful. It is a straightforward process of steeping, straining, and setting with pectin, resulting in a unique condiment you can enjoy year-round.
Understanding Lilacs as an Edible Flower
Before we gather our ingredients, it is crucial to understand the primary component. Not all flowers are safe to eat, and proper identification is the first and most important step in this process.
Identifying and Selecting the Right Lilacs
The common lilac, or Syringa vulgaris, is the variety most frequently used for culinary purposes. Its flowers are known to be safe for consumption. Always be certain of your plant’s identity before harvesting. If you are unsure, do not use the flowers.
The best time to pick lilacs is in the morning after the dew has evaporated but before the sun becomes too intense. This is when the volatile oils responsible for their aroma are most concentrated. Look for blooms that are freshly opened and vibrant in color. Avoid any flowers that appear wilted, brown, or have been treated with pesticides or herbicides.
The Importance of Color and Scent
You will notice that lilacs come in various shades, from pure white to deep purple. The color can influence the final hue of your jelly. Deeper purple blossoms often yield a jelly with a more pronounced pink or amber tone, while white lilacs will produce a lighter, golden preserve. The flavor, however, is remarkably consistent across colors.
The strength of the fragrance is your best indicator of flavor potential. A highly fragrant bush will produce a more flavorful jelly. If the flowers have little scent, the resulting jelly will be very mild.
Preparing Lilacs for Jelly
Proper preparation is key to extracting the maximum flavor and ensuring a clean, sediment-free jelly. Rushing this step can lead to a cloudy final product or one with unwanted green, bitter notes.
Harvesting and Cleaning Your Blossoms
Using a clean pair of garden shears or scissors, snip the flower clusters from the bush. You will need a generous amount, as the flowers are light and airy. Place them in a wide basket or bowl to avoid crushing them.
Once inside, you must separate the tiny individual florets from the main stem. The green parts of the plant, including the main stem and the smaller green stems holding each floret, can impart a bitter, vegetal taste to your jelly. Gently run your fingers along the main cluster, allowing the purple or white petals to fall away into a clean bowl.
Removing Stems and Green Parts
This is a meditative process. Take your time to pluck the florets, ensuring you remove as much of the small green base (the calyx) as possible from each tiny flower. A small amount is unavoidable, but a diligent effort here will reward you with a superior, purely floral taste. You should aim for about 4 cups of tightly packed, stem-free blossoms for a standard batch.
The Steeping Process: Creating Lilac Juice
The foundation of lilac jelly is the infused liquid, which I refer to as “lilac juice.” This is not a pressed juice but an infusion, much like making a tea.
Place your 4 cups of prepared lilac blossoms into a large, non-reactive bowl. A glass or ceramic bowl is ideal. Bring 4 cups of water to a rolling boil. Pour the boiling water directly over the flowers, ensuring they are completely submerged.
You will immediately be greeted by a wave of that classic lilac perfume. Now, cover the bowl with a clean plate or plastic wrap and let it steep. This is not a quick process. Allow the infusion to sit for at least 4 hours, though I prefer to leave it overnight, or for up to 12 hours, at room temperature. This extended time allows the water to fully absorb the floral essences and delicate color.
Straining for Clarity
After the steeping period, the water will have taken on a subtle tint and a distinct aroma. The next step is to separate the spent blossoms from the liquid. Line a fine-mesh strainer with a double layer of cheesecloth or a nut milk bag. Place this over another clean bowl or a large measuring pitcher.
Slowly pour the lilac infusion through the cheesecloth. Do not press or squeeze the flowers, as this can force through fine particles and make the jelly cloudy. Instead, let gravity do the work. You can give the cheesecloth a gentle twist at the end to extract the last of the clear liquid, but avoid applying heavy pressure. You should have approximately 3 to 3.5 cups of lilac infusion.
How to Make Lilac Jelly Recipe
This is the core of the process, where we transform the fragrant infusion into a beautifully set preserve. Read through all instructions before you begin and ensure your canning equipment is prepared if you plan to preserve the jelly for long-term storage.
Recipe Details
- Prep Time: 40 minutes (plus 12 hours steeping)
- Cook Time: 20 minutes
- Servings: Makes approximately 5 half-pint (8 oz) jars
- Course: Condiment, Preserve
- Cuisine: American
- Diet: Vegetarian, Gluten-Free
Ingredients
- 4 cups tightly packed, stem-free lilac blossoms (from about 8-10 large clusters)
- 4 cups boiling water
- 3 cups granulated sugar
- 1/4 cup fresh-squeezed lemon juice (from about 1-2 lemons)
- 1 (1.75 oz) package of powdered pectin
- 1/2 teaspoon unsalted butter (optional, to reduce foaming)
Instructions
- Follow the instructions in the previous section to prepare 3 to 3.5 cups of strained lilac infusion.
- Place the lilac infusion into a large, heavy-bottomed pot. An 8-quart stockpot is ideal as it prevents boil-overs.
- Slowly whisk in the entire package of powdered pectin until it is fully dissolved and no lumps remain.
- Add the lemon juice and the optional butter to the pot.
- Place the pot over high heat and bring the mixture to a full, rolling boil that cannot be stirred down.
- Once boiling vigorously, add all of the sugar at once. Stir continuously to ensure the sugar dissolves completely.
- Return the mixture to a full, rolling boil. Boil hard for exactly 1 minute, stirring constantly.
- After 1 minute, remove the pot from the heat. Skim off any foam that has formed on the surface with a spoon.
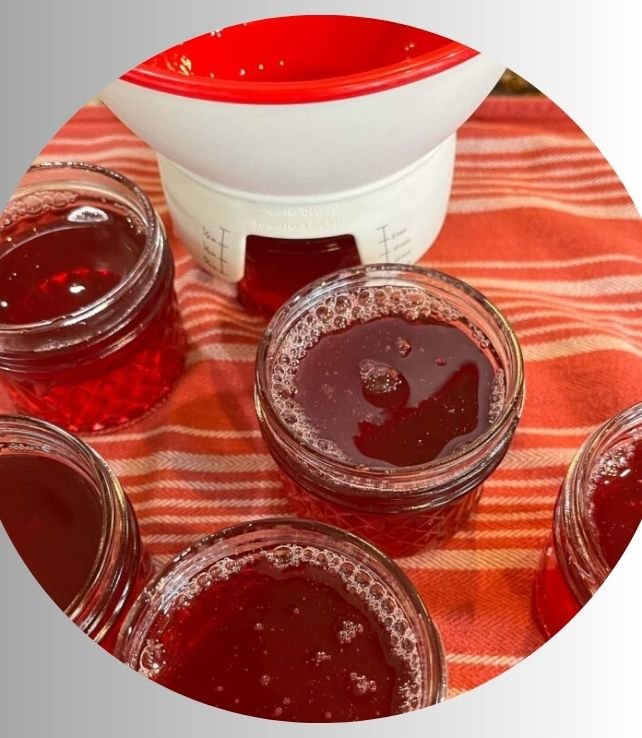
- Immediately begin ladling the hot jelly into your prepared, hot jars, leaving 1/4 inch of headspace.
- Wipe the jar rims clean with a damp cloth, apply the lids and rings, and process in a water bath canner for 10 minutes (adjusting for altitude as needed).
Nutrition
- Calories: 50 kcal
- Protein: 0 g
- Fat: 0 g
- Carbohydrates: 13 g
- Sugar: 13 g
- Fiber: 0 g
- Sodium: 0 mg
- Cholesterol: 0 mg
*Nutrition information is an estimate for one tablespoon and will vary based on specific ingredients and yield.
Cooking Method
This recipe utilizes the open-kettle method combined with water bath canning. The jelly is cooked in an open pot to achieve the correct sugar concentration and pectin set. The final step of processing in a boiling water bath is what seals the jars and makes the preserves shelf-stable, destroying any potential microorganisms.
Tools Needed
- Large 8-quart stockpot
- Large glass or ceramic bowl
- Fine-mesh strainer
- Cheesecloth or a nut milk bag
- Ladle
- Canning funnel
- Jar lifter
- 5 half-pint canning jars with new lids and rings
- Water bath canner or a very large, deep pot with a rack
The Science of Setting Jelly
Understanding the roles of the core ingredients will empower you to troubleshoot and achieve a perfect set every time.
The Role of Pectin
Pectin is a natural soluble fiber found in fruits, and it is the gelling agent. Lilacs contain very little natural pectin, which is why we must add it. Powdered pectin works by creating a network that traps the liquid when combined with the correct balance of sugar and acid. It must be fully dissolved in the cool liquid before boiling to activate properly.
Acid and Sugar: The Essential Partners
Lemon juice serves two critical functions. First, its acidity is necessary for the pectin to form a gel. Without sufficient acid, the pectin chains will not bond effectively, resulting in a runny syrup. Second, it provides a flavor balance, cutting through the sweetness of the sugar and enhancing the floral notes.
Sugar is not just a sweetener; it acts as a preservative and works with the pectin to draw water out of the pectin network, helping it to firm up. The specific ratio of sugar to liquid is vital for the chemical reaction that causes the jelly to set as it cools.
Canning Lilac Jelly for Preservation
If you plan to store your jelly at room temperature for more than a few weeks, processing it in a water bath canner is a safe and effective method.
Water Bath Canning Versus Pressure Canning
Water bath canning is the appropriate method for high-acid foods, which includes fruit jellies and jams. The acid, combined with the high temperature of the boiling water, creates an environment that prevents the growth of spoilage bacteria and molds. Pressure canning is used for low-acid foods like vegetables and meats and is not necessary or recommended for this recipe.
Step-by-Step Guide to Water Bath Canning
Step 1: Preparing the Jars
Wash your jars, lids, and rings in hot, soapy water. Place the jars right-side-up on a rack in your canner. Fill the canner and jars with hot water to submerge them. Bring the water to a simmer (180°F) and keep the jars hot until ready to fill.
Step 2: Preparing the Seals and Rings
Place the new, unused flat lids in a small saucepan and cover them with hot water. Keep them hot but not boiling. The rings can be kept at room temperature.
Step 3: Preparing the Canner
If you have not already done so, fill your canner about halfway with water and bring it to a boil. You need enough water to cover the jars by at least 1 inch once they are added.
Step 4: Filling the Jars
Using a jar lifter, remove one hot jar from the canner. Pour the water back into the canner. Place the jar on a towel-covered surface. Use a canning funnel and a ladle to fill the jar with hot jelly, leaving 1/4 inch of headspace. Wipe the rim clean with a damp cloth to ensure a good seal. Place a hot lid on top and screw on a ring until it is fingertip-tight—just until you feel resistance. Do not overtighten.
Step 5: Boiling the Jars of Food
Carefully lower the filled jar into the boiling water bath canner using the jar lifter. Repeat with all jars. Ensure the jars are covered by at least 1 inch of water. Once the water returns to a full boil, start your timer. Process the jars for 10 minutes, adjusting the time if you live at an altitude above 1,000 feet.
After processing, turn off the heat and let the jars sit in the water for 5 minutes before removing them. Place them on a towel, spaced a few inches apart, to cool for 12-24 hours. You will hear satisfying “pops” as the jars seal.
Nutritional and Dietary Considerations
From my perspective as a dietitian, it is important to view this jelly for what it is: a sweet condiment. Its value lies in the experience and the connection to seasonal, home-grown ingredients, not in its macronutrient profile.
Nutritional Breakdown of the Final Product
The primary components are carbohydrates from sugar. It contains minimal traces of vitamins or minerals from the lilacs and lemon juice. Therefore, it should be enjoyed in moderation as part of a balanced diet. The pleasure derived from a homemade, natural product without artificial flavors or colors is a benefit in itself.
Dietary Adaptations
Low-Sugar and Sugar-Free Variations
You can adapt this recipe for a lower sugar intake. You must use a pectin specifically designed for low- or no-sugar recipes, such as Pomona’s Universal Pectin. These pectins use calcium water to activate the gel instead of relying on a high sugar concentration. Follow the instructions on the package precisely, as they differ significantly from standard pectin.
Vegan Adaptation
The standard recipe is already vegan. The optional 1/2 teaspoon of butter is used solely to reduce foaming and can be omitted without any impact on the set or flavor of the jelly.
How to Eat Lilac Blossom Jelly
The delicate floral flavor of this preserve opens up a world of pairing possibilities beyond the standard toast.
It is sublime spread on a warm scone with clotted cream, creating a classic cream tea experience. Pair it with soft, mild cheeses like brie or goat cheese on a cracker for an elegant appetizer. For a simple dessert, spoon it over vanilla ice cream or pound cake. You can even use it as a glaze for roasted chicken or pork, adding a sweet and floral note to a savory dish.
Common Mistakes and Expert Tips
After making countless batches, I have identified the most common pitfalls and how to avoid them.
- Cloudy Jelly: This is almost always caused by squeezing the cheesecloth during straining. Be patient and let the liquid drip through naturally.
- Jelly Didn’t Set: This can happen if the pectin wasn’t fully dissolved before boiling, if the mixture wasn’t brought to a full, rolling boil for the full minute, or if the sugar/acid/pectin ratio was off. If your jelly doesn’t set, you can re-cook it with a bit more pectin and lemon juice.
- Weak Flavor: Using blossoms that were not fragrant enough or not steeping them long enough are the usual culprits. Always trust your nose when harvesting.
- Too Much Foam: The optional 1/2 teaspoon of butter added with the lemon juice is remarkably effective at minimizing foam. Skimming any remaining foam before jarring ensures a clear jelly.
Cultural and Historical Context
The practice of preserving flowers and herbs in sugar is ancient, with roots in the Middle East. The Victorian era in Europe and America saw a particular fascination with “sweetmeats” and floral flavors. Lilac jelly is a part of this tradition of “cottage cookery,” a way to capture the fleeting beauty of a spring garden and extend its enjoyment through the colder months. It represents a resourceful and creative approach to the ingredients growing in one’s immediate environment.
Storage and Shelf Life
Properly processed and sealed jars of lilac jelly can be stored in a cool, dark place for up to one year. Once opened, refrigerate the jelly and consume it within 3 months. If you choose not to process the jars in a water bath, the jelly must be stored in the refrigerator and used within one month, or frozen for longer storage.
Frequently Asked Questions
Can I use any color of lilac to make this jelly?
Yes, all common lilac colors are suitable. The primary difference will be in the final color of the jelly, not the flavor. Deep purple lilacs yield a pinkish jelly, while white lilacs produce a golden-yellow preserve.
Why did my lilac jelly not set properly?
The most common reasons are not achieving a full, rolling boil for the full minute after adding the sugar, inaccurate measuring of ingredients, or using old or inactive pectin. Ensure your pectin is fresh and follow the boiling instructions precisely.
Is it safe to forage for lilacs?
Only if you are 100% certain of the plant’s identity and that it has not been treated with chemicals