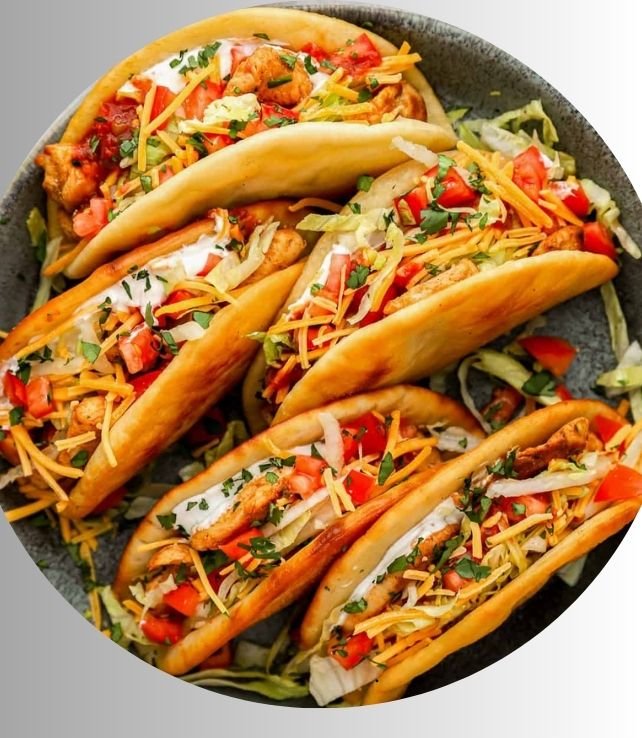
You know the feeling of a meal that is both satisfying and interactive, where everyone at the table can build their own perfect bite. That’s the experience I wanted to recreate in my own kitchen, moving beyond the drive-thru version to something I could feel good about serving. The chicken chalupa, with its distinct fried shell, seasoned meat, and cool toppings, became a project.
This recipe is the result of that kitchen project, balancing authentic texture and flavor with a method you can manage at home. We will cover everything from the history of the dish to the science of frying the perfect shell, its nutritional profile, and how to adapt it for various dietary needs. My goal is to provide you with all the information you need to make this dish successfully on your first attempt.
Understanding the Chalupa: A Brief History
The word “chalupa” comes from Spanish, originally referring to a small boat or canoe. In Mexican culinary tradition, particularly in the states of Puebla, Oaxaca, and Guerrero, a chalupa is an antojito, or street food snack. It typically involves a small, thick, boat-shaped masa (corn dough) base that is fried until crisp, then topped with salsa, shredded meat, onions, and cheese.
The version popularized by large chains is a distinct adaptation. It uses a flat, fried wheat flour tortilla that puffs up during cooking to create a shell that is both crispy and chewy. This recipe focuses on that familiar, puffed shell format, using a hybrid approach to honor the concept’s roots while achieving a specific, well-known result. Understanding this background helps us appreciate the components we are working with.
Deconstructing the Ingredients for Success
Every component in this dish has a purpose. Choosing the right ingredients and understanding their roles is the first step toward a superior final product.
The Foundation: The Shell
The shell is the defining element. While traditional Mexican chalupas use masa harina, the version we are making uses all-purpose flour for its gluten content, which allows the dough to stretch and puff dramatically when fried.
All-Purpose Flour: The protein (gluten) in wheat flour creates an elastic network. When the dough hits the hot oil, the water inside turns to steam. The gluten traps that steam, causing the shell to balloon and become airy inside while crisping outside. Using bread flour would make it too chewy; cake flour would not provide enough structure.
Leavening Agents: A small amount of baking powder provides an additional lift, ensuring a consistent puff.
Fat in the Dough: Adding a small amount of oil or melted shortening to the dough inhibits some gluten formation, which paradoxically gives a more tender final texture alongside the crispness.
The Heart: The Chicken Filling
The chicken should be flavorful, moist, and easy to eat inside the shell. Shredded chicken breast is a common choice for its lean profile and ability to absorb seasonings.
Chicken Breast: Poaching or simmering the breast in a lightly flavored broth keeps it exceptionally moist and provides a base flavor. The key is to not overcook it; an internal temperature of 165°F (74°C) is perfect. Letting it rest before shredding allows the juices to redistribute.
The Seasoning Blend: This is where you build depth. A combination of chili powder (which is itself a blend), cumin, paprika, garlic powder, and onion powder creates a warm, savory, and slightly smoky profile. Toasting whole cumin seeds and grinding them fresh can elevate this significantly.
The Accents: Toppings and Sauces
Toppings provide contrast in temperature, texture, and flavor, cutting through the richness of the fried shell and seasoned meat.
Lettuce: Use a crisp variety like iceberg or romaine. It adds a crucial fresh, watery crunch.
Tomatoes: Roma tomatoes are less watery than beefsteak. Removing the seeds and gel further prevents sogginess.
Cheese: A finely shredded, mild cheese like cheddar or a Mexican blend melts easily and adds salty, fatty notes.
Sour Cream: Its cool tang and rich mouthfeel balance the spices.
Salsa: Whether a fresh pico de gallo or a smooth tomato-based salsa, it introduces acidity and heat.
How to Make Chicken Chalupa Recipe
This process is broken down into three main stages: preparing the filling, making and frying the shells, and assembling. I recommend reading through all instructions before beginning.
Recipe Details
- Prep Time: 45 minutes (includes dough resting)
- Cook Time: 30 minutes
- Servings: 4 (2 chalupas per person)
- Course: Main Course
- Cuisine: Tex-Mex
- Diet: Contains gluten, dairy
Ingredients
- For the Chicken Filling:
- 1 lb (450g) boneless, skinless chicken breasts
- 2 cups low-sodium chicken broth or water
- 1 tablespoon vegetable oil
- 1 small onion, finely diced
- 2 cloves garlic, minced
- 1 tablespoon chili powder
- 1 teaspoon ground cumin
- 1/2 teaspoon smoked paprika
- 1/2 teaspoon garlic powder
- 1/2 teaspoon onion powder
- 1/4 teaspoon dried oregano
- Salt and black pepper to taste
- For the Chalupa Shells:
- 2 cups (250g) all-purpose flour, plus more for dusting
- 1 teaspoon baking powder
- 1/2 teaspoon salt
- 2 tablespoons vegetable oil or melted shortening
- 3/4 cup warm water (approx.)
- 1 quart (1 liter) neutral oil for frying (e.g., canola, peanut)
- For Assembly:
- 2 cups shredded crisp lettuce
- 1 cup diced tomatoes, seeds removed
- 1 cup finely shredded cheddar or Mexican blend cheese
- 1/2 cup sour cream
- 1/2 cup salsa of choice
Instructions
- Prepare the Chicken: Place the chicken breasts in a medium saucepan and cover with broth or water. Bring to a gentle simmer over medium heat. Reduce heat to low, cover, and cook for 12-15 minutes, or until the internal temperature reaches 165°F (74°C). Remove chicken, let it cool slightly, then shred it using two forks. Reserve 1/2 cup of the cooking liquid.
- Season the Chicken: In a large skillet, heat 1 tablespoon of oil over medium heat. Sauté the diced onion until soft, about 5 minutes. Add the minced garlic and cook for 1 minute until fragrant. Add the chili powder, cumin, paprika, garlic powder, onion powder, and oregano. Stir constantly for 30 seconds to toast the spices. Add the shredded chicken and the reserved 1/2 cup cooking liquid. Stir until the chicken is evenly coated and the liquid is absorbed. Season with salt and pepper. Remove from heat and cover to keep warm.
- Make the Dough: In a large bowl, whisk together the flour, baking powder, and salt. Add the 2 tablespoons of oil and mix with your fingers until the mixture resembles coarse crumbs. Gradually add the warm water, mixing until a shaggy dough forms. Turn out onto a lightly floured surface and knead for 3-4 minutes until smooth and elastic. Place the dough back in the bowl, cover with a damp cloth, and let it rest for 30 minutes.
- Shape the Shells: Divide the rested dough into 8 equal pieces. Roll each piece into a smooth ball. On a floured surface, roll each ball into a thin oval or circle, about 6-7 inches in diameter and 1/8 inch thick. They do not need to be perfectly round.
- Fry the Shells: In a deep, heavy-bottomed pot or Dutch oven, heat 2-3 inches of frying oil to 375°F (190°C). Use a thermometer for accuracy. Carefully slide one dough round into the hot oil. It will sink, then immediately begin to puff. Within 10-15 seconds, using metal tongs or a spider skimmer, gently but firmly press the center of the puffing shell down into the oil. Hold it there for a few seconds. This forces the shell to form the characteristic “boat” shape with a flat bottom and puffed sides. Fry for 60-90 seconds total per side, flipping once, until golden brown and crisp. Drain upright in a wire rack set over a baking sheet or in a bowl lined with paper towels. Repeat with remaining dough, maintaining the oil temperature.
- Assemble: While shells are still warm, fill the center of each with the warm chicken mixture. Top with shredded lettuce, diced tomatoes, cheese, a dollop of sour cream, and salsa. Serve immediately.
Nutrition
- Calories: 680 kcal (per serving, 2 chalupas)
- Protein: 38 g
- Fat: 32 g
- Carbohydrates: 58 g
- Sugar: 4 g
- Fiber: 4 g
- Sodium: 720 mg
- Cholesterol: 105 mg
Note: Nutritional values are estimates based on the specific ingredients listed and include all toppings. Values will vary with substitutions.
Cooking Method
The primary cooking methods used are poaching/simmering for the chicken and deep-frying for the shells. Poaching in liquid guarantees moist chicken. Deep-frying at the correct temperature is non-negotiable for achieving a shell that is crisp, not greasy, and properly puffed.
Tools Needed
- Medium saucepan with lid
- Large skillet
- Large mixing bowl
- Rolling pin
- Deep, heavy-bottomed pot or Dutch oven (for frying)
- Candy/deep-fry thermometer
- Metal tongs or spider skimmer
- Wire cooling rack
- Baking sheet (to place under rack)
Nutritional Analysis and Dietary Considerations
As a dietician, I look at meals through the lens of balance and adaptability. This dish provides a substantial amount of protein from the chicken, which supports muscle maintenance and promotes satiety. The vegetables contribute fiber, vitamins A and C, and antioxidants. The main considerations are the refined carbohydrates in the shell and the saturated fat from frying and dairy toppings.
Portion control is effective here; one filled shell with a generous side salad can be a complete meal. The nutritional profile can also be modified significantly through the adaptations below.
Adapting for Specific Diets
This recipe is highly adaptable. Here are tested modifications.
Gluten-Free
Replace the all-purpose flour with a gluten-free 1:1 baking blend that contains xanthan gum. The dough may be more delicate to handle, so roll it between two pieces of parchment paper. The frying method remains the same.
Dairy-Free
Omit the cheese and sour cream. Use a dairy-free sour cream alternative made from cashews or coconut, and consider adding sliced avocado for creaminess.
Lower-Calorie / Lower-Fat
For the chicken, use a cooking spray instead of oil to sauté the onions and spices, adding a splash of broth if needed. For the shell, consider a “puffed” method using a tortilla press and a hot, dry skillet, though the texture will be more like a tostada. Load up on extra lettuce, tomatoes, and salsa to increase volume without many calories.
Vegan Variation
Replace the chicken with 2 cans (15 oz each) of black beans or pinto beans, rinsed and mashed slightly. Season the beans with the same spice blend, using vegetable broth. Use all the dairy-free suggestions above.
Common Mistakes and How to Avoid Them
After testing this process multiple times, I identified a few key points where things can go wrong.
Dough is Too Tough or Won’t Puff
This is usually due to over-kneading, which develops too much gluten, making the dough elastic and resistant to stretching. Knead just until smooth. Letting the dough rest is also critical; it relaxes the gluten, making the dough easier to roll thin and more likely to puff.
Shells are Greasy or Soggy
Greasy shells are a direct result of oil temperature being too low. The food absorbs the oil before a crust can form. Always use a thermometer and allow the temperature to recover between batches. Do not overcrowd the pot.
Shells Don’t Form a Good “Boat” Shape
The timing of the “press” is everything. If you press too early, the shell might not puff at all. If you press too late, it will have already set in a large bubble. Wait for it to initially puff, then immediately press the center down. This technique requires a bit of confidence.
Chicken Filling is Dry
Overcooking the chicken breast is the culprit. Using a thermometer ensures you remove it from the heat as soon as it’s done. The residual carryover heat will finish the job. Shredding it while still slightly warm also helps retain moisture.
Serving, Pairing, and Storage Guidance
What to Serve With Chalupas
Since the chalupa is a complete handheld meal, side dishes should be light and simple. A black bean soup or a corn and black bean salad works well. For a more substantial spread, consider Mexican rice or a simple cilantro-lime slaw.
Storing and Reheating Leftovers
Store components separately for best results. The cooked, seasoned chicken will keep in an airtight container in the refrigerator for 3-4 days. The fried shells are best eaten immediately but can be stored at room temperature in a paper bag (not plastic) for a day. To re-crisp, place in a 350°F (175°C) oven for 5 minutes.
Assembled chalupas do not store well, as the shell will become soggy from the toppings.
Make-Ahead Strategies
You can prepare the chicken filling 2 days in advance. The dough can be made, portioned into balls, and refrigerated overnight in an airtight container; let it come to room temperature for 30 minutes before rolling. Rolling and frying the shells is best done just before serving.
The Science of the Puff: Why It Works
The dramatic puff of the chalupa shell is a perfect example of kitchen physics and chemistry in action. When the rolled dough hits the 375°F oil, three things happen rapidly. First, the water in the dough instantly vaporizes into steam. Second, the gluten network we developed by kneading acts like a balloon, stretching to contain that expanding steam. Third, the heat sets the starch and protein structure, turning the stretched dough into a rigid, crisp shell.
The baking powder provides a secondary, chemical leavening. When activated by the heat and moisture, it produces carbon dioxide gas, contributing additional lift to the steam’s work. The pressing step manually directs this expansion to create the ideal shape for holding fillings.
Frequently Asked Questions
Can I bake the chalupa shells instead of frying them?
Baking will not produce the same puffed, crisp-chewy texture. You can bake the rolled dough on a hot pizza stone or inverted baking sheet at a high temperature (450°F/230°C), but it will result in a flat, crisp tostada-like base, not a puffed shell.
What type of oil is best for frying the shells?
Use an oil with a high smoke point and neutral flavor. Canola, peanut, vegetable (soybean), or sunflower oil are all excellent choices. Avoid olive oil (except perhaps light olive oil) as it has a lower smoke point and a pronounced flavor.
My dough is very sticky. What should I do?
Add flour sparingly, one tablespoon at a time, while kneading until the dough becomes manageable. Stickiness often means the dough is too hydrated. Conversely, if it’s cracking and dry, add warm water a teaspoon at a time.
How can I make the chicken filling more spicy?
Increase the amount of chili powder, add a pinch of cayenne pepper to the spice blend, or incorporate 1-2 finely chopped chipotle peppers in adobo sauce when you add the shredded chicken.
Can I use pre-cooked or rotisserie chicken?
Yes, this is an excellent time-saver. Use about 3 cups of shredded rotisserie chicken. Sauté your onions and spices, then add the shredded chicken and about 1/3 cup of chicken broth or water to moisten and allow the flavors to meld. Heat through.
Are chalupas and gorditas the same thing?
No, though they are related. A gordita (“little fat one” in Spanish) is typically made from masa, fried or griddled until puffy, then sliced open to form a pocket. A traditional chalupa is a fried masa boat, not a pocket. The flat,