Last Updated on April 1, 2026 by Emma
The first time I ordered the Herb Crusted Chicken at Texas Roadhouse, I was struck by its simplicity and depth of flavor. It wasn’t the most complex dish on the menu, but it was executed with a precision that made each component stand out. The crisp, savory crust gave way to exceptionally tender chicken, a combination that felt both rustic and refined.
After that meal, I was determined to understand how to recreate that experience in a home kitchen. This recipe is the result of that process, a methodical breakdown designed to guide you to the same perfect result. It is more than a list of ingredients; it is a comprehensive guide to technique, ingredient selection, and the science behind a successful herb crust.
You will find the complete recipe below, followed by detailed analysis to answer every question you might have before you begin cooking.
How to Make Texas Roadhouse Herb Crusted Chicken Recipe
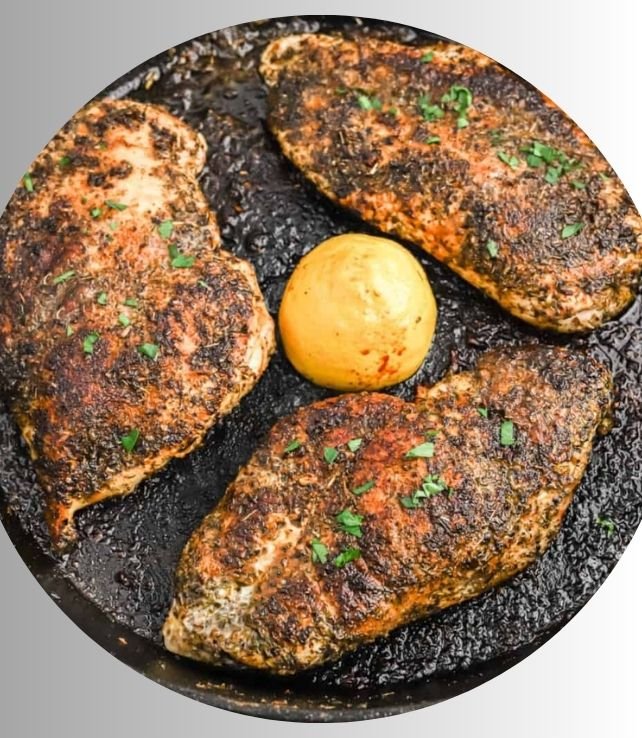
This section provides the complete, step-by-step formula for creating the dish. Read through all instructions once before you start to prepare your workspace and ingredients. Mise en place, the practice of having everything in its place, is critical for a smooth cooking process with this recipe.
Recipe Details
- Prep Time: 20 minutes
- Cook Time: 20 minutes
- Servings: 4
- Course: Main Course
- Cuisine: American
- Diet: Gluten-Free Adaptable
Ingredients
- 4 boneless, skinless chicken breasts (about 6 ounces each)
- 1/4 cup olive oil
- 2 tablespoons fresh lemon juice
- 1 cup fine breadcrumbs (plain)
- 1/2 cup grated Parmesan cheese
- 2 teaspoons dried basil
- 2 teaspoons dried oregano
- 1 teaspoon dried dill
- 1 teaspoon garlic powder
- 1 teaspoon onion powder
- 1 teaspoon salt
- 1/2 teaspoon black pepper
- Optional: 1 tablespoon fresh parsley, chopped
Instructions
- Place the chicken breasts between two sheets of plastic wrap or in a large zip-top bag. Using a kitchen mallet or a heavy skillet, pound the chicken until it is an even 1/2-inch thickness throughout. This step is non-negotiable for even cooking.
- In a shallow bowl, whisk together the olive oil and lemon juice. In a separate shallow bowl or plate, combine the breadcrumbs, Parmesan cheese, dried basil, oregano, dill, garlic powder, onion powder, salt, and pepper. Mix until all ingredients are fully incorporated.
- Pat the chicken breasts dry with a paper towel. Dip each breast first into the olive oil and lemon juice mixture, ensuring it is fully coated. Allow any excess to drip off.
- Next, press the chicken firmly into the breadcrumb and herb mixture. Turn it over and press again to form a uniform, thick crust on all sides. Place the coated chicken on a clean plate.
- Heat a large, heavy-bottomed skillet over medium heat. Add a tablespoon of olive oil to the pan. Once the oil shimmers, carefully add the chicken breasts, being careful not to overcrowd the pan. You may need to cook in two batches.
- Cook for 4-6 minutes on the first side, without moving, until the crust is golden brown. Flip the chicken and cook for another 4-6 minutes on the second side.
- The chicken is done when the internal temperature reaches 165°F (74°C) on an instant-read thermometer and the juices run clear. Transfer to a clean plate or cutting board and let it rest for 5 minutes before serving.
Nutrition
- Calories: 435 kcal
- Protein: 42 g
- Fat: 22 g
- Carbohydrates: 22 g
- Sugar: 2 g
- Fiber: 2 g
- Sodium: 980 mg
- Cholesterol: 115 mg
Cooking Method
The primary cooking method for this dish is pan-searing in a skillet. This technique uses direct, conductive heat from the pan to create a flavorful, browned crust through the Maillard reaction. The high heat seals in the chicken’s juices quickly, resulting in a moist interior while developing complex flavors in the herb and breadcrumb coating. It is a stovetop method that provides more control than baking, allowing you to monitor the browning process closely.
Tools Needed
- Large skillet (cast iron is ideal)
- Kitchen mallet or heavy-bottomed pan
- Shallow bowls (two)
- Measuring cups and spoons
- Instant-read meat thermometer
- Tongs
- Plastic wrap or a large zip-top bag
Ingredient Analysis and Selection
Every component in this recipe has a specific functional and flavor purpose. Understanding these roles allows for intelligent substitutions and a deeper appreciation for the final product.
The Chicken: Boneless, Skinless Breasts
Boneless, skinless chicken breasts are the foundation. They provide a lean, blank canvas that readily accepts the herb crust. The key is their thickness, or rather, the lack of uniform thickness in most store-bought breasts. The tender part of the breast is much thicker than the tapered end, which guarantees uneven cooking if not addressed. Pounding is the essential technique that solves this, creating a piece of meat that cooks at the same rate from edge to edge.
Building the Flavor Foundation: Oils and Acids
The combination of olive oil and lemon juice is a classic culinary bridge. The olive oil acts as a cooking fat and a binder for the dry crust mixture. Its monounsaturated fats carry fat-soluble flavors from the herbs and contribute to a crisp texture. The lemon juice, while also aiding adhesion, provides a subtle acidity that brightens the rich flavors of the Parmesan and herbs, preventing the dish from tasting heavy.
Deconstructing the Herb Crust
The crust is a multi-layered flavor system. Let’s examine its parts.
Breadcrumbs: The Structural Element
Fine, plain breadcrumbs create the crust’s structure. They brown beautifully and provide a delicate crunch. Their neutral flavor allows the herbs and cheese to be the stars. Using Italian-seasoned breadcrumbs is not recommended, as the pre-mixed seasonings can clash with the specific herb profile we are building from scratch.
Parmesan Cheese: Umami and Adhesion
Grated Parmesan cheese is not just for flavor. It introduces a powerful umami quality that deepens the overall taste. From a practical standpoint, the cheese melts during cooking, helping to fuse the breadcrumbs and herbs into a cohesive crust that adheres to the chicken.
The Herb Trio: Basil, Oregano, and Dill
This specific combination is what defines the “herb crusted” character. Dried basil offers a sweet, slightly minty warmth. Dried oregano contributes a robust, earthy, and slightly bitter note that is quintessential to many American steakhouse seasonings. Dill is the unexpected element, providing a light, grassy, and tangy flavor that cuts through the richness. Using dried herbs is preferable here, as they withstand the cooking heat better than fresh ones and provide a more concentrated, rustic flavor that mimics the restaurant version.
Supporting Spices: Garlic and Onion Powder
Garlic powder and onion powder are used instead of their fresh counterparts for two reasons. First, they distribute evenly throughout the dry mixture. Second, they dehydrate and toast during cooking, developing a sweeter, more rounded flavor than fresh garlic or onion, which can burn and become bitter in the time it takes to cook the chicken through.
Nutritional Breakdown
From a dietary perspective, this dish is a balanced source of macronutrients when paired appropriately. A single serving provides a high amount of protein, approximately 42 grams, which is crucial for muscle repair, satiety, and metabolic function. The fat content, around 22 grams, comes primarily from the olive oil and Parmesan cheese, providing a mix of monounsaturated and saturated fats.
The carbohydrates are almost exclusively from the breadcrumbs. The sodium level is significant, largely from the added salt and Parmesan cheese. For those monitoring sodium intake, using a low-sodium breadcrumb and reducing the added salt by half can lower the content without sacrificing too much flavor. The dish contains no trans fats and is naturally free of added sugars.
Dietary Adaptations
This recipe is versatile and can be modified to suit various dietary needs without compromising its core identity.
Gluten-Free Version
Substitute the plain breadcrumbs with an equal amount of gluten-free panko-style breadcrumbs. Ensure that your gluten-free breadcrumbs are finely ground for the best texture. The rest of the ingredients are naturally gluten-free.
Dairy-Free and Vegan Adaptation
Creating a fully vegan version requires more significant changes. Replace the chicken with thick slices of firm, pressed tofu or a plant-based chicken alternative. For the crust, omit the Parmesan cheese. To compensate for the lost umami and adhesion, add 2 tablespoons of nutritional yeast and 1 tablespoon of ground flaxseed to the breadcrumb mixture. The flavor profile will be different but still savory and satisfying.
Lower-Sodium Version
Reduce the added salt to 1/2 teaspoon. Use a low-sodium Parmesan cheese if available, and be sure to select breadcrumbs with no added salt. The herbs and spices will provide ample flavor, making the reduction in salt less noticeable.
Cultural and Historical Context
The Herb Crusted Chicken is a product of the modern American casual dining scene, epitomized by chains like Texas Roadhouse. This style of cooking draws from a “steakhouse” tradition that emphasizes hearty, familiar, and generously portioned food. The use of a herb crust is a technique with European roots, particularly from Italian and French cuisines where breading and pan-frying are common.
Texas Roadhouse integrated this technique into its menu to offer a “lighter” alternative to its signature steaks, while still maintaining the robust, savory flavors its customers expect. It represents a bridge between the simplicity of home cooking and the elevated execution of a professional kitchen.
Common Mistakes and Expert Tips
Avoiding these common errors will dramatically increase your chances of perfect results on the first attempt.
Skipping the Pounding Step
This is the most frequent error. Uneven chicken leads to a burnt crust on the thin end while the thick center remains raw. Pounding is not optional; it is the most critical step for texture and food safety.
Using an Incorrect Skillet Temperature
If the pan is not properly preheated to a medium heat, the chicken will steam and absorb oil, resulting in a greasy, soggy crust. If the pan is too hot, the breadcrumbs will burn before the chicken cooks through. The oil should shimmer but not smoke when you add the chicken.
Moving the Chicken Too Soon
After placing the chicken in the pan, resist the urge to move it or check it for at least 4 minutes. This allows the crust to set and release naturally from the pan surface. If you try to move it too early, you will tear the crust.
Overcrowding the Pan
Cooking too many pieces at once drastically reduces the pan’s temperature, causing the chicken to release its juices and boil in the liquid. This results in a pale, steamed coating. Cook in batches to ensure each piece has enough space.
Not Using a Thermometer
Guessing doneness by color or time alone is unreliable. An instant-read thermometer is the only way to know the chicken has reached the safe internal temperature of 165°F (74°C) without overcooking it.
Serving, Pairing, and Storage
What to Serve with Herb Crusted Chicken
This chicken pairs well with sides that complement its savory, crispy nature. Traditional steakhouse accompaniments are a natural fit.
- Starches: Creamy mashed potatoes, seasoned rice pilaf, or a baked sweet potato.
- Vegetables: Steamed green beans, roasted asparagus, a fresh house salad, or sautéed seasonal vegetables.
- Sauces: While not necessary, a side of ranch dressing, a light cream sauce, or extra lemon wedges can be offered.
How to Store Leftovers
Allow any leftover chicken to cool completely to room temperature. Store it in an airtight container in the refrigerator for up to 3 days. The crust will soften upon storage due to moisture migration from the chicken.
Reheating for Best Results
To restore some of the crust’s texture, avoid using a microwave. Reheat leftovers in a conventional oven or toaster oven at 375°F (190°C) for 10-15 minutes, or until heated through. You can also re-crisp it in an air fryer for about 5 minutes at 350°F (175°C).
The Science of the Crust
The perfect crust is a product of the Maillard reaction, a chemical interaction between amino acids and reducing sugars that occurs when food is exposed to heat. This reaction is responsible for the brown color and the complex, savory flavors. The breadcrumbs and Parmesan cheese are particularly rich in the compounds needed for this reaction. The oil in the pan facilitates even heat transfer and promotes browning. The moisture from the lemon juice and chicken surface must evaporate for the Maillard reaction to begin, which is why a properly heated pan is so important.
Frequently Asked Questions
Can I use fresh herbs instead of dried?
You can, but the flavor and texture will change. Fresh herbs contain more water and are less concentrated. If substituting, use three times the amount of fresh herbs (e.g., 2 tablespoons fresh basil instead of 2 teaspoons dried). Be aware that fresh herbs can burn more easily and may make the crust slightly wetter.
Why did my herb crust fall off the chicken?
This usually happens for one of three reasons: the chicken was not patted dry before coating, the chicken was moved too early in the cooking process before the crust had set, or the oil in the pan was not hot enough, causing the coating to absorb oil instead of searing.
Can I bake this chicken instead of pan-frying it?
Yes. To bake, preheat your oven to 400°F (200°C). Place the coated chicken on a wire rack set over a baking sheet. Lightly spray the chicken with cooking spray to encourage browning. Bake for 15-20 minutes, or until the internal temperature reaches 165°F. The crust will be slightly less crispy than the pan-seared version but still very good.
What is the best way to pound chicken without making a mess?
Place the chicken breast inside a large, heavy-duty zip-top bag or between two sheets of sturdy plastic wrap. This contains any splatter. Use the flat side of a meat mallet or the bottom of a heavy, flat-bottomed skillet. Start from the center and pound outward toward the edges for even thickness.
How can I make this recipe ahead of time?
You can prepare the chicken up to the point of cooking. After coating the chicken in the crust mixture, place the finished pieces on a parchment-lined tray, cover tightly with plastic wrap, and refrigerate for up to 4 hours before cooking. Do not leave it longer, as the salt will begin to draw moisture out of the chicken, making the crust soggy.
Is this recipe considered healthy?
This dish is a good source of lean protein. The fat content is moderate and comes primarily from heart-healthy olive oil. The main considerations are the sodium content and the use of refined breadcrumbs. When served with a balanced portion of vegetables and a complex carbohydrate, it can be part of a healthy diet. For a healthier version, use whole-wheat breadcrumbs and reduce the salt and cheese slightly.
What can I use if I don’t have a meat thermometer?
While a thermometer is highly recommended, you can check for doneness by making a small cut into the thickest part of the chicken breast. The meat should be white throughout with no traces of pink, and the juices should run clear. This method is less reliable and can result in overcooked chicken.